အခန်း ၅ :: Software Design and Architecture

ဒီ အခန်းမှာ စနစ် တစ်ခု ဘယ်လို တည်ဆောက်ရမလဲ။ Planning တွေ လုပ်ရမလဲ။ လိုက်နာသင့်သည့် စည်းမျည်း စည်းကမ်း အကြောင်းတွေ ပါဝင်မှာပါ။ ဒီ အခန်း မဖတ်ခင်မှာ အရင်ကရေးထားသည့် Developer Intern စာအုပ် နှင့် Design Pattern စာအုပ် ကို အရင် ဖတ်ထား ရင် ပို အဆင်ပြေပါမယ်။ အဲဒီ စာအုပ် ထဲမှာ အသေးစိတ် ရေးထားပြီး ဒီ စာအုပ်မှာတော့ အခန်း တစ်ခု စာ အနှစ်ချုပ် ပုံစံ ပဲ ပါဝင်ပါလိမ့်မယ်။
အခု Requirement တွေ ရပြီးနောက် ဘာဆက်လုပ်မလဲ။ ဘယ်လို တည်ဆောက်မလဲ ဆိုတာကို ဆုံးဖြတ်သည့် အပိုင်းကတော့ Software Design နဲ့ Architecture ပဲ ဖြစ်ပါတယ်။ ဒီအခန်းက Software Engineering ပိုင်း မှာ အရေးပါသည့် အစိတ်အပိုင်း တစ်ခုပါ။ ကောင်းမွန်သည့် design နှင့် architecture ရှိမှသာ Software တစ်ခုက quality ၊ maintainability , scalability တွေ ရှိလာမှာ ဖြစ်ပါတယ်။
Architecture ဆိုတာ စနစ်တစ်ခုလုံးရဲ့ အဆင့်မြင့် တည်ဆောက်ပုံ ၊ High level structure ဖြစ်ပါတယ်။ အိမ်ဆောက်မယ်ဆိုရင် အိမ်ရဲ့ ပုံစံ ၊ အခန်း ဖွဲ့စည်းပုံ ၊ တိုင်တွေ ဘယ်နားမှာ ထူမယ် ပြတင်းပေါက် ကို ဘယ်နားထားမယ်။ တံခါးဝင်ပေါက် ဘယ်လို ရှိမယ် စည့် အစိတ်အပိုင်းတွေ နဲ့ သူတို့ အချင်းချင်း ဘယ်လို ချိတ်ဆက်ထားလဲ ဆိုတာကို ဖော်ပြထားတာပါ။
Design ကတော့ Component တစ်ခုချင်းစီရဲ့ အတွင်းပိုင်း အသေးစိတ် တည်ဆောက်ပုံ အသေးစိတ်ကို ဖော်ပြခြင်း ဖြစ်ပါတယ်။ အခန်းထဲမှာ ပရိဘောဂ ဘယ်လိုထားမယ်။ မီးကြိုး ဘယ်လို သွယ်မယ် ဆိုသည့် အသေးစိတ် အစိတ်အပိုင်းမျိုးပေါ့။
5.1 Fundamental Design Concept
ကောင်းမွန်သည့် Software Design တိုင်းမှာ အောက်ပါ အချက်တွေ ပါဝင်လေ့ ရှိပါတယ်။
Abstraction
ရှုပ်ထွေးသည့် အလုပ်တွေကို ဖုံးကွယ်ထားပြီး ရိုးရှင်းသည့် interface တစ်ခုကိုသာ အသုံးပြုသူကို ပြသပေးထားတာပါ။ အခန်း ၁ မှာ OOP နဲ့ ပတ်သက်ပြီး ရှင်းပြခဲ့သလိုပါပဲ။ ကားမောင်းသည့် သူက စတီယာရင် ကိုင်ပြီး မောင်းရုံပါပဲ။ အင်ဂျင်ထဲမှာ ပလပ် ဘယ်လို မီးပွင့်သွားတယ် သိစရာ မလိုပါဘူး။ ဘယ်လို အလုပ်လုပ် သိဖို့ မလိုပဲ ဘာလုပ်သလဲ ကိုသာ သိဖို့ လိုအပ်ပါတယ်။
Cohesion
Module တစ်ခု အတွင်း မှာ ရှိသည့် အစိတ်အပိုင်း functions, data က တူညီသည့် ရည်ရွယ်ချက် တစ်ခု အတွက် ဘယ်လောက်ထိ ဆက်စပ်မှု ရှိလဲ ဆိုတာကို တိုးတာ ခြင်းပါ။ High Cohesion ဖြစ်ဖို့ လိုပါတယ်။ ဆိုလိုတာက Module တစ်ခုက တာဝန်တစ်ခု တည်းကို သာ ကောင်းကောင်း လုပ်ဆောင်သင့်ပါတယ်။
ဥပမာ - EmailService module ဆိုရင် Email ပို့တာ နဲ့ ပတ်သက်သည့် အလုပ်တွေကိုပဲ လုပ်သင့်ပါတယ်။ User Login ဝင်တာ ပိုက်ဆံ ရှင်းတာ သွားမလုပ်သင့်ပါဘူး။
ဒီအဆင့်မှာ High Cohesion နဲ့ Single Responsibility ကို တူတယ်လို့ ထင်ကြတာ ရှိတယ်။ တကယ်တန်း က မတူပါဘူး။
ဥပမာ High Cohesion လို့ ထင်ရပေမယ့် SRP မရှိသည့် class တစ်ခုကို ကြည့်ရအောင်။
class UserProfile {
    updateUsername(id: number, newName: string) {
        // Update name logic
    }
    updateAvatar(id: number, image: Blob) {
        // Image resizing & upload logic
    }
    changePassword(id: number, newPass: string) {
        // Encryption logic
    }
}
ဒီနေရာမှာ မတူညီသည့် ရှုထောင့် နှစ်ခု နဲ့ သုံးသပ်ကြည့်ပါမယ်။
Cohesion အရ High Cohesion ဖြစ်နေပါတယ်။ Method ၃ ခု လုံး က User နဲ့ ဆိုင်တယ်။ Username ပြောင်းတာ User ပုံပြောင်းတာ User Password ပြောင်းတာ။ အကုန် User အကြောင်းချည်းပါပဲ။ တူရာ စုထား တာပါ။ ဒါကြောင့် High Cohesion လို့ ပြောလို့ရတယ်။
SRP အရတော့ ချိုးဖောက်နေပါတယ်။ SRP အရ ဒီ Class ကို ဘယ်သူ လာပြင်မှာလဲ။ Security အရ change password ကို လုပ်မယ်။ design အရ updateAvatar ကို လုပ်မယ်။ database အရ updateUsername လုပ်မယ်။
User ဆိုသည့် ခေါင်းစဥ် အောက်မှာ စုထားလို့ Cohesion ရှိတယ် လို့ ထင်ရပေမယ့် တကယ်တန်း ပြင်ဆင်ရမည့် response to change က မတူဘူး။ SRP ဖြစ်မနေဘူး။ တနည်းပြောရင် High Chohesion ရှိတယ်။ SRP မဖြစ်ဘူး။ SRP ဖြစ်တာ နဲ့ အများအားဖြင့် အလိုလို High Cohesion ဖြစ်သွားပါတယ်။ ဒါပေမယ့် High Cohesion ဖြစ်တိုင်း SRP ဖြစ်မနေပါဘူး။
SRP ဖြစ်အောင် UserProfile ကို ပြင်ရရင်
- UserAuth
- UserMedia
- UserData
ဆိုပြီး class တွေ ခွဲထုတ်မှ သာ ရပါမယ်။
တနည်းဆိုရရင်
- High Cohesion က ခေါင်းစဥ် ကို ကြည့်တယ်။ ဥပမာ ဒါတွေ အကုန်လုံး User နဲ့ ဆိုင်လား။ ဆိုင်ရင် တနေရာတည်းထားမယ်
- SRP က အပြောင်းအလဲ ကို ကြည့်တယ်။ ဥပမာ ဒီ code ကို ပြင်ရမယ့် အကြောင်းအရင်း က ဘယ်နှစ်ခု ရှိလဲ။ တစ်ခု ထက် ပိုရင် ခွဲထုတ်မယ်။
ထပ်ပြီး နားလည်အောင် ပြောရရင် StringUtlis class တစ်ခုမှာ
reverseString()capitalize()htmlEncode()encryptPassowrd()
တို့ပါတယ်။ ဒါက High Cohesion ဖြစ်တယ်။ ဒါပေမယ့် SPR ဖြစ်မနေဘူး။ Encryption က security နဲ့ ဆိုင်တယ်။ HTML encoding က Encoding နဲ့ ဆိုင်တယ်။ Logic တွေက string ဆိုသည့် ခေါင်းစဥ်အောက်မှာ စုနေပေမယ့် ပြောင်းလဲရမယ့် အကြောင်းအရင်း က တူမနေပါဘူး။
Coupling
Module နှစ်ခု သို့မဟုတ် နှစ်ခု ထက် ပိုသည့် Module တွေ အချင်းချင်း ဘယ်လောက် ထိ မှီခိုနေလဲ ဆိုတာပါ။ Low Coupling ဖြစ်ဖို့ ကို ရည်မှန်းရပါမယ်။ Module တွေက တတ်နိုင်သမျှ လွတ်လပ်စွာ ရည်တည်နိုင်သင့်တယ်။ ဥပမာ - Payment Module ကို ပြင်လိုက်တာနဲ့ Product module ကို လိုက်ပြင်နေရရင် ဒါ Coupling များနေတာပါ။ မကောင်းပါဘူး။
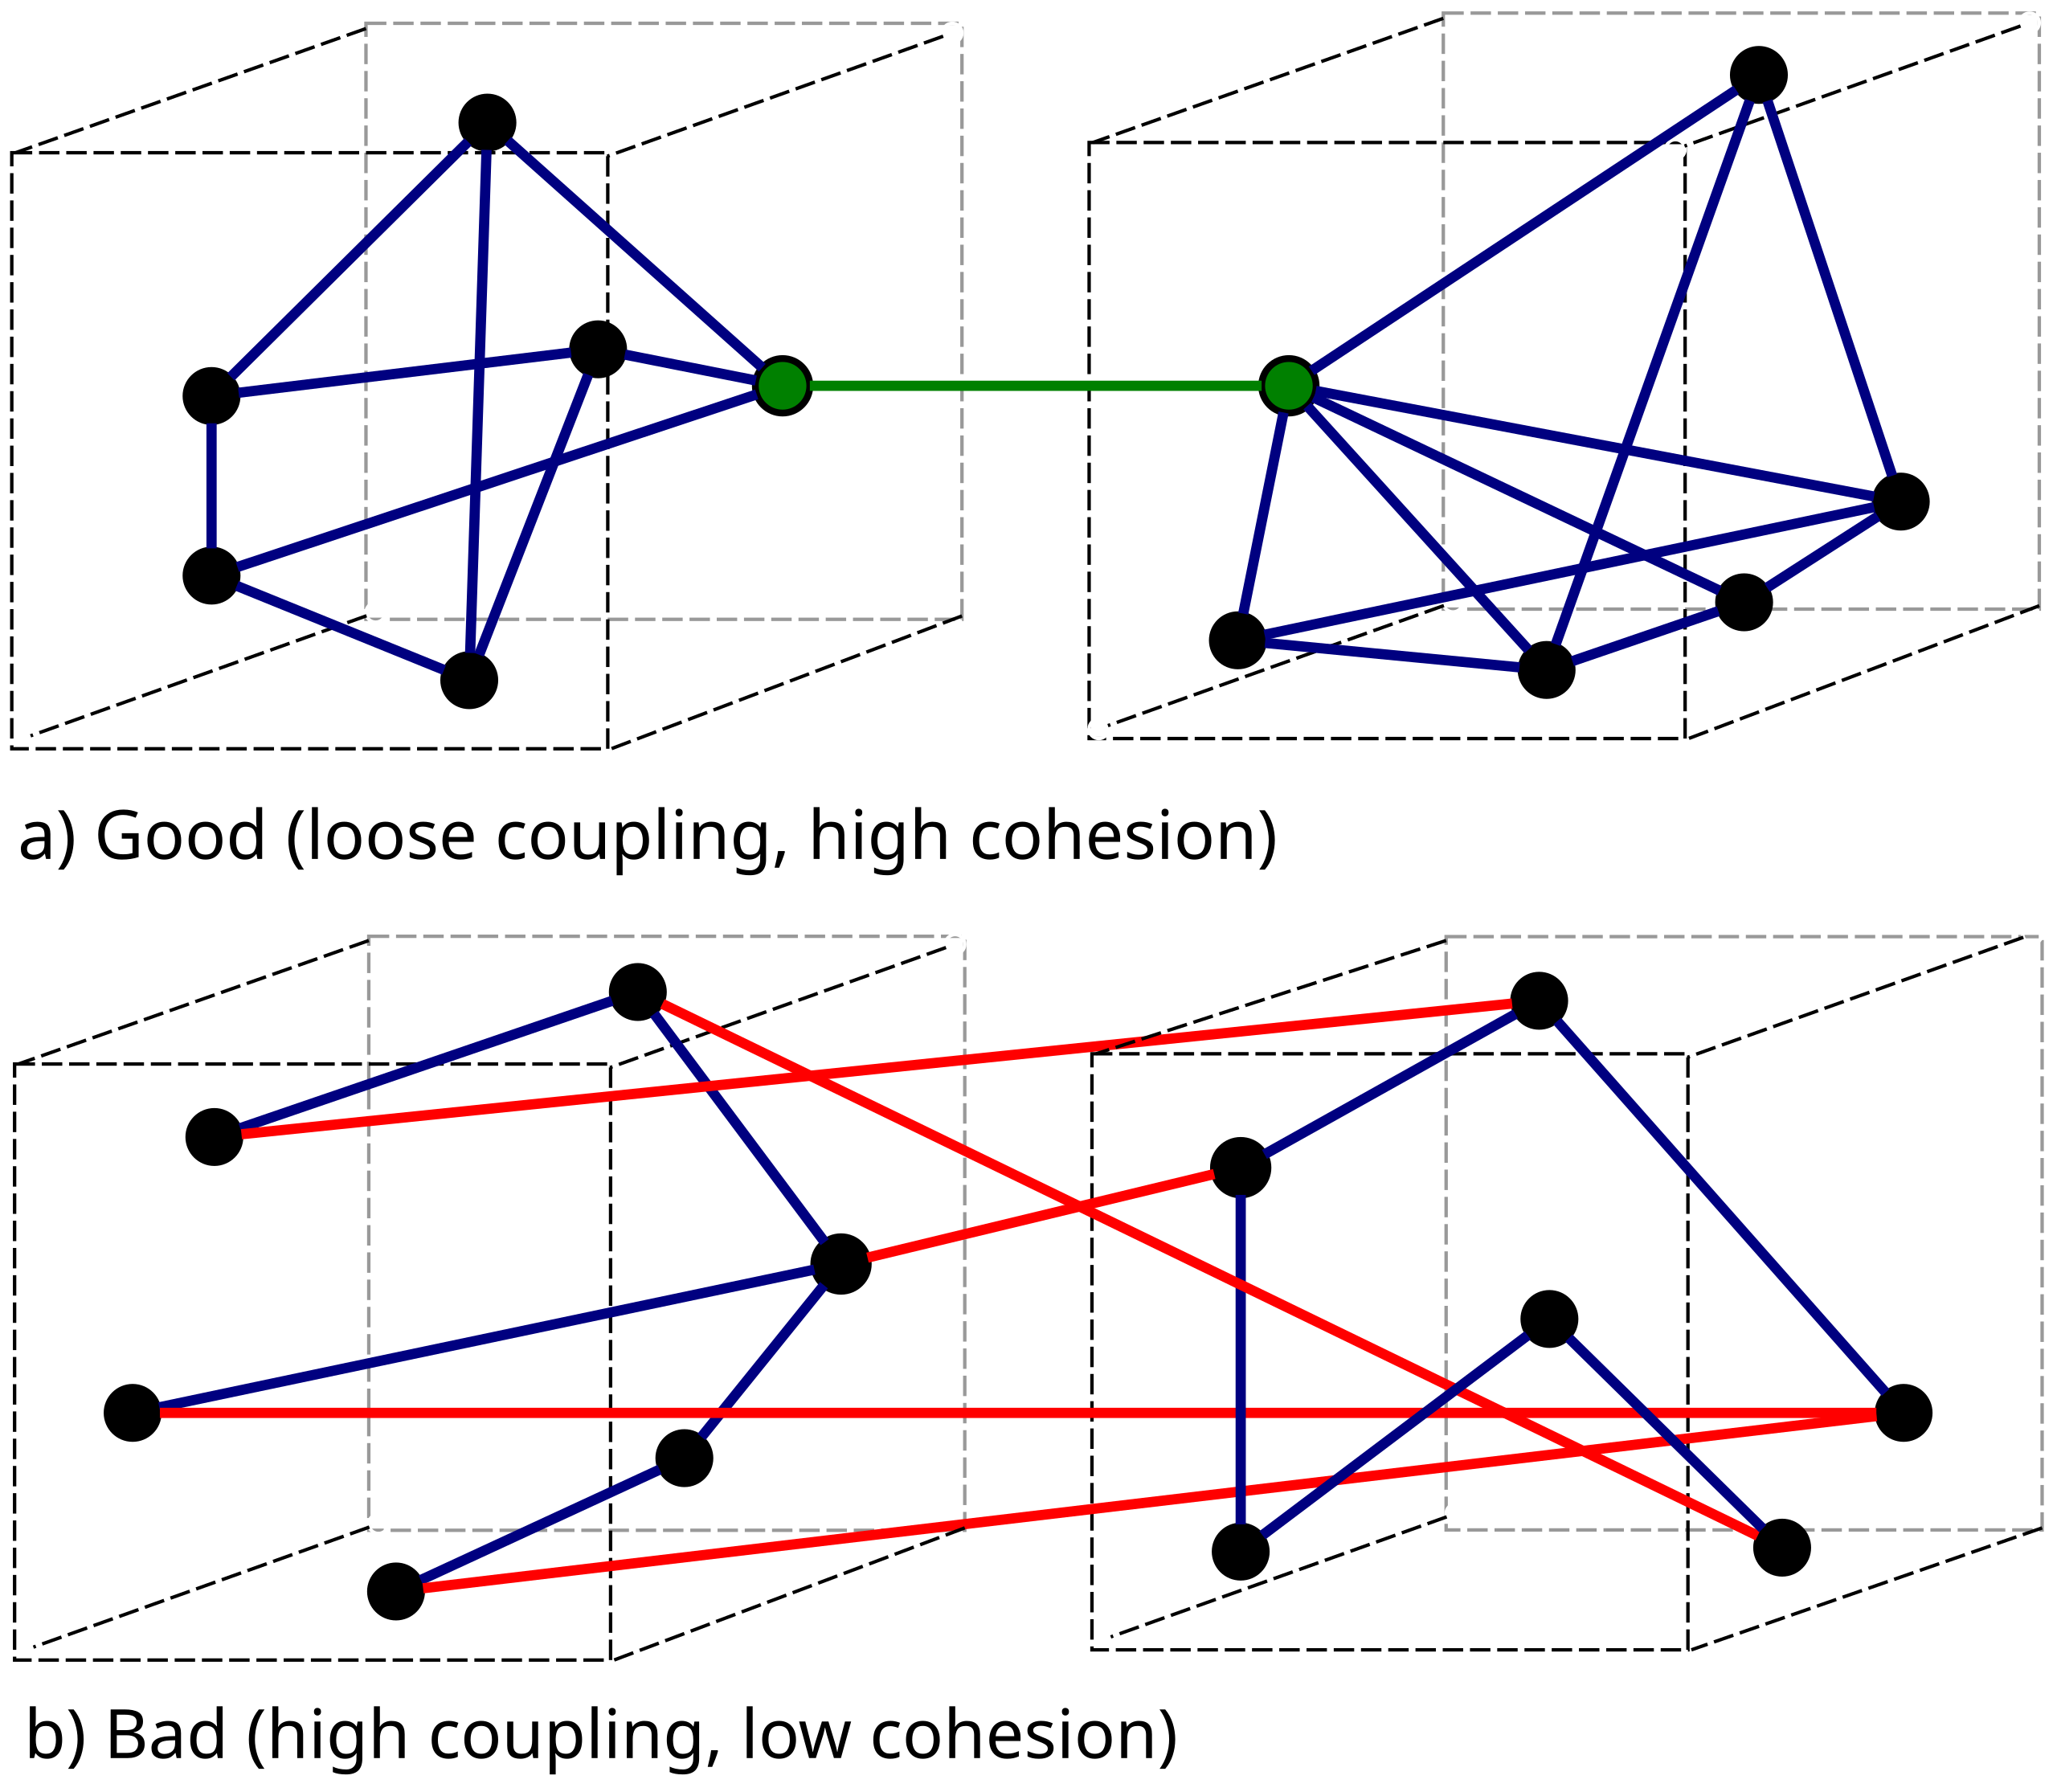
ဒီပုံမှာ ဆိုရင် dot လေးတွေက function ဆိုပါဆိုတော့ ။ loose coupling မှာ ဆိုရင် အများကြီး မှီခို မှု မရှိဘူး။ တနည်းပြောရင် တနေရာ ပဲ ရှိတယ်ပေါ့။ high coupling ဆိုရင် ဒီ function ထဲကို ဒီဘက်က data တွေ pass လုပ်ပေးနေရသည့် သဘော။ ဥပမာ MPU Payment ကနေ KBZ Payment ပြောင်းချင်လို့ Product ဘက်က accept payment နေရာမှာ ပြန်ပြင်ရတာမျိုး။ ဥပမာ
function payment(MPUPayment payment) {
}
ဒါဆိုရင် MPUPayment ကို မှီခိုနေတာတွေ့ရမှာပါ။ အကယ်၍ MPU မသုံးတော့ဘူး။ KBZ ပြောင်းမယ်ဆိုရင် ဒီ function ပြန်ပြင်ရပါပြီ။ ဒါမမဟုတ် နောက်ထပ် function တစ်ခု ထပ်လုပ်ရပါပြီ။
Modularity
စနစ်ကြီး တစ်ခုလုံး ကို သေးငယ်ပြီး လွတ်လပ်သည့် စားထိုးလို့ လွယ်သည့် Module လေးတွေ အဖြစ် ခွဲခြမ်း စိတ်ဖြာ တည်ဆောက်တာပါ။ Lego တုံးလေးတွေ လိုပါပဲ။ ပျက်သွားရင် အဲဒီ အတုံးလေးပဲ ဖြုတ်လဲလိုက်လို့ရသလိုမျိုး Maintainability နဲ့ Reusability ကို ကောင်းမွန်စေပါတယ်။
၅.၂ Software Architecture Fundamentals
၅.၂.၁ Architectural Styles vs. Patterns vs. Tactics
1. Architectural Style
ဒါက အမြင့်ဆုံး Level ဖြစ်ပါတယ်။ စနစ်တစ်ခုလုံးကို ဘယ်လို ပုံစံမျိုးနဲ့ တည်ဆောက်မလဲဆိုတဲ့ အခြေခံ အယူအဆ (Philosophy) သို့မဟုတ် အမျိုးအစား (Category) ဖြစ်ပါတယ်။
- ဆောက်လုပ်ရေး ဥပမာ: အိမ်ဆောက်မယ် ဆိုပါစို့။ "ကိုလိုနီခေတ် ပုံစံ အိမ်ဆောက်မလား"၊ "ခေတ်မီ မှန်လုံ တိုက်အိမ် ဆောက်မလား"၊ "မြန်မာမှု ပုံစံ သစ်သားအိမ် ဆောက်မလား" ဆိုတာမျိုးပါ။ ဒါက အိမ်တစ်ခုလုံးရဲ့ Style ပါ။
- Software ဥပမာ:
- Monolithic Style: အားလုံးကို တစ်စုတစ်စည်းတည်း တည်ဆောက်တာ။
- Microservices Style: ဝန်ဆောင်မှု အသေးလေးတွေ အဖြစ် ခွဲထုတ် တည်ဆောက်တာ။
- Client-Server Style: အသုံးပြုသူအပိုင်း (Client) နဲ့ ဝန်ဆောင်မှုပေးတဲ့အပိုင်း (Server) ခွဲခြားထားတာ။
- Event-Driven Style: အလုပ်တွေကို Event တွေအပေါ် အခြေခံပြီး မောင်းနှင်တာ။
2. Architectural Pattern
Style တစ်ခုရဲ့ အောက်မှာမှ တွေ့ကြုံနေကျ ပြဿနာတွေကို ဖြေရှင်းဖို့ စနစ်တကျ ချမှတ်ထားတဲ့ ဖွဲ့စည်းပုံ (Structural Solution) တွေ ဖြစ်ပါတယ်။ Component တွေ ဘယ်လို ဖွဲ့စည်းထားလဲ၊ ဘယ်လို ချိတ်ဆက်လဲ ဆိုတာကို သတ်မှတ်ပေးတာပါ။
ဆောက်လုပ်ရေး ဥပမာ: ခေတ်မီ တိုက်အိမ် (Style) ဆောက်မယ်လို့ ဆုံးဖြတ်ပြီးပြီ။ အိမ်ထဲမှာ အခန်းတွေ ဘယ်လိုဖွဲ့မလဲ။ "ဧည့်ခန်း နဲ့ မီးဖိုချောင် တွဲထားတဲ့ (Open Kitchen) ပုံစံ ဖွဲ့မလား"၊ "အိပ်ခန်းတိုင်းမှာ ရေချိုးခန်း တွဲလျက် ပါတဲ့ (Master Bedroom) ပုံစံ ဖွဲ့မလား"။ ဒါတွေက အခန်းဖွဲ့စည်းပုံဆိုင်ရာ Pattern တွေပါ။
Software ဥပမာ:
- Layered Pattern (n-tier): Presentation, Business Logic, Database ဆိုပြီး အလွှာလိုက် ခွဲခြား တည်ဆောက်တာ။
- MVC (Model-View-Controller): User Interface နဲ့ Logic ကို သီးသန့် ခွဲထုတ်ထားတာ။
- Pub-Sub (Publisher-Subscriber): သတင်းအချက်အလက် ပို့သူနဲ့ လက်ခံသူ ကြားမှာ တိုက်ရိုက် မချိတ်ဆက်ဘဲ ကြားခံစနစ်နဲ့ ချိတ်ဆက်တာ။
3. Architectural Tactic (အရည်အသွေးဆိုင်ရာ နည်းဗျူဟာ)
ဒါကတော့ ဖွဲ့စည်းပုံ အကြီးကြီး ပြောင်းတာမျိုး မဟုတ်ဘဲ Quality Attribute (Performance, Security, Availability) တစ်ခုခု ကောင်းလာအောင် လုပ်ဆောင်လိုက်တဲ့ သီးသန့် နည်းဗျူဟာ (Design Decision) လေးတွေ ဖြစ်ပါတယ်။
- ဆောက်လုပ်ရေး ဥပမာ: အိမ်ပုံစံ (Style) နဲ့ အခန်းဖွဲ့စည်းပုံ (Pattern) ရပြီ။ အခု "လုံခြုံရေး ကောင်းချင်တယ် (Security)"။ ဒါဆိုရင် ခြံစည်းရိုးမှာ သံဆူးကြိုး ကာမယ်၊ CCTV တပ်မယ်။ "မီးပျက်ရင် မီးရချင်တယ် (Availability)"။ ဒါဆို မီးစက် (Generator) တပ်ထားမယ်။ ဒီလို တပ်ဆင်လိုက်တဲ့ အရာတွေက Tactic ပါပဲ။
- Software ဥပမာ:
- Heartbeat: Server အလုပ်လုပ်နေလား သိရအောင် အချက်ပြ စစ်ဆေးခြင်း (Availability အတွက် Tactic)။
- Caching: Data ကို မြန်မြန် ရအောင် ယာယီ သိမ်းထားခြင်း (Performance အတွက် Tactic)။
- Encryption: Data တွေကို လျှို့ဝှက်ကုဒ် ပြောင်းခြင်း (Security အတွက် Tactic)။
- Redundancy: Server တစ်လုံး ပျက်ရင် နောက်တစ်လုံး အလုပ်လုပ်ဖို့ အပိုထားခြင်း (Reliability အတွက် Tactic)။
၅.၂.၂ Quality Attributes and Architectural Tradeoffs
Quality Attributes ဆိုတာ အခန်း ၄ မှာ ဆွေးနွေးခဲ့တဲ့ Non-Functional Requirements (NFRs) တွေကို Architecture ရှုထောင့်ကနေ နည်းပညာဆန်ဆန် ခေါ်ဝေါ်တဲ့ စကားရပ်ဖြစ်ပါတယ်။ စနစ်တစ်ခုက "ဘာလုပ်ပေးနိုင်သလဲ" ဆိုတာထက် "ဘယ်လို လုပ်ပေးသလဲ (Quality)" ဆိုတာကို တိုင်းတာတာပါ။
Architect တစ်ယောက်ရဲ့ အဓိက အလုပ်က ဒီ Quality Attribute တွေကို မျှတအောင် ချိန်ညှိပေးရတာပါ။ ဘာလို့လဲဆိုတော့ Software Engineering မှာ "No Free Lunch" ဆိုတဲ့ စကားလိုပါပဲ။ အရည်အသွေးတစ်ခု ကောင်းအောင် လုပ်လိုက်ရင် နောက်တစ်ခု ကျသွားတတ်လို့ပါ။ ဒီသဘောတရားကို Tradeoff လို့ခေါ်ပါတယ်။
The Art of Tradeoffs
အကောင်းဆုံး Architecture ဆိုတာ နေရာတိုင်းမှာ ပြည့်စုံနေတာမျိုး မဟုတ်ပါဘူး။ Project ရဲ့ Business Goal ပေါ်မူတည်ပြီး ဘယ်အရာကို အနစ်နာခံမလဲ၊ ဘယ်အရာကို ဦးစားပေးမလဲဆိုတာ ဆုံးဖြတ်ထားတဲ့ Architecture သာလျှင် အကောင်းဆုံး ဖြစ်ပါတယ်။
ထင်ရှားတဲ့ Architectural Tradeoff ဥပမာတွေကို ကြည့်လိုက်ရအောင်။
၁။ Performance vs. Security (စွမ်းဆောင်ရည် နှင့် လုံခြုံရေး)
Data တွေကို လုံခြုံအောင် Encryption တွေ အများကြီး ခံမယ်၊ Firewall တွေ အထပ်ထပ် စစ်မယ်၊ 2-Factor Authentication (2FA) တွေ ခံမယ်ဆိုရင် Security အရမ်းကောင်းသွားပါမယ်။ ဒါပေမဲ့ တဖက်မှာ Processing လုပ်ရတာ များသွားတဲ့အတွက် Performance အနည်းငယ် ကျသွားနိုင်သလို၊ User အနေနဲ့လည်း အဆင့်ဆင့် ဖြတ်ကျော်ရတဲ့အတွက် Usability လည်း ကျသွားနိုင်ပါတယ်။
- Tradeoff Decision: ဘဏ်ဆော့ဖ်ဝဲလ် (Bank App) ဖြစ်ရင် Security ကို ဦးစားပေးပြီး Performance အနည်းငယ် နှေးတာကို လက်ခံရပါမယ်။ ဒါပေမဲ့ Game တစ်ခုဆိုရင်တော့ Performance က အဓိက ဖြစ်ပြီး Security ကို ဒုတိယ နေရာ ထားရပါလိမ့်မယ်။
၂။ Scalability vs. Cost (တိုးချဲ့နိုင်စွမ်း နှင့် ကုန်ကျစရိတ်)
စနစ်ကို လူသိန်းချီ သုံးနိုင်အောင် Server တွေ အများကြီး ခွဲထားမယ် (Microservices သုံးမယ်)၊ Auto-scaling လုပ်ထားမယ်ဆိုရင် Scalability အရမ်းကောင်းပါတယ်။ ဒါပေမဲ့ Server ဖိုး Cost (ကုန်ကျစရိတ်) တွေ တက်လာသလို၊ စနစ်က ရှုပ်ထွေးလာတဲ့အတွက် Maintain လုပ်ရခက်ခဲ (Complexity) လာပါတယ်။
- Tradeoff Decision: Startup စစချင်းမှာ ငွေမရှိသေးတဲ့အတွက် Monolithic နဲ့ စပြီး Scalability ကို ခဏမေ့ထားတာက မှန်ကန်တဲ့ Tradeoff ဖြစ်နိုင်ပါတယ်။
၃။ Time-to-Market vs. Maintainability (မြန်မြန်ပြီးခြင်း နှင့် ပြုပြင်ထိန်းသိမ်းမှု)
Market ထဲကို အမြန်ရောက်အောင် Code တွေကို အမြန်ရေးမယ်၊ Design Pattern တွေ သိပ်မလိုက်နာဘူး၊ Test တွေ သိပ်မရေးဘူးဆိုရင် Time-to-Market မြန်ပါမယ်။ ဒါပေမဲ့ ရေရှည်မှာ Code တွေ ရှုပ်ပွပြီး ပြန်ပြင်ရ ခက်သွားတဲ့ Technical Debt တွေ တင်လာပါလိမ့်မယ်။
အောက်ပါ Diagram မှာ Tradeoff သဘောတရားကို ရှင်းပြထားပါတယ်။ တစ်ဖက်ကို ဆွဲတင်လိုက်ရင် ကျန်တစ်ဖက်က လျော့သွားတတ်တဲ့ သဘောပါ။
graph TD
    subgraph Tradeoff_Examples [Common Architectural Tradeoffs]
        direction TB

        T1[<b>Security vs Performance</b><br/>More encryption = Slower speed]
        T2[<b>Reliability vs Cost</b><br/>More backup servers = Higher server bill]
        T3[<b>Development Speed vs Quality</b><br/>Rush release = More bugs/Tech Debt]

        style T1 fill:#ffdddd,stroke:#333
        style T2 fill:#ddffdd,stroke:#333
        style T3 fill:#ddddff,stroke:#333
    end

    Decision((Architectural<br/>Decision)) --> T1
    Decision --> T2
    Decision --> T3
၅.၂.၃ Architecture Documentation and Views (4+1 Model)
Software Architecture တစ်ခုကို တည်ဆောက်တဲ့အခါ "မှန်ကန်တဲ့ Documentation ရှိဖို့" ဆိုတာ အင်မတန် အရေးကြီးပါတယ်။ ဒါပေမဲ့ ပြဿနာက ရှုပ်ထွေးလှတဲ့ စနစ်ကြီးတစ်ခုလုံးကို Diagram တစ်ခုတည်းနဲ့ ပြည့်စုံအောင် ဆွဲပြဖို့ ဆိုတာ မဖြစ်နိုင်ပါဘူး။ အိမ်ဆောက်တဲ့အခါမှာတောင် အိမ်ရဲ့ အလှအပကို ပြတဲ့ ပုံစံ၊ ရေပိုက်သွယ်တန်းပုံ၊ မီးကြိုးသွယ်တန်းပုံ ဆိုပြီး ပုံစံမျိုးစုံ (Blueprints) လိုအပ်သလိုပါပဲ။
ဒီပြဿနာကို ဖြေရှင်းဖို့ Philippe Kruchten က 4+1 View Model ကို မိတ်ဆက်ခဲ့ပါတယ်။ သူက စနစ်တစ်ခုကို ရှုထောင့် (View) ၅ ခုခွဲပြီး ကြည့်ဖို့ အကြံပြုထားပါတယ်။ ဒါမှသာ သက်ဆိုင်ရာ Stakeholder တွေက မိမိတို့ လိုအပ်တဲ့ အချက်အလက်ကို ရှင်းရှင်းလင်းလင်း မြင်ရမှာ ဖြစ်ပါတယ်။
mindmap
  root((4+1 View Model))
    Logical View
      (End-Users)
      ::icon(fa fa-user)
      Functional Requirements
    Process View
      (Integrators)
      ::icon(fa fa-cogs)
      Non-Functional Requirements
    Development View
      (Programmers)
      ::icon(fa fa-code)
      Software Management
    Physical View
      (System Engineers)
      ::icon(fa fa-server)
      Topology & Deployment
    Scenarios
      (All Stakeholders)
      ::icon(fa fa-check-circle)
      Validation & Consistency
၁. Logical View (The Functional View)
ပစ်မှတ်: End-users, Business Analysts, Designers
ရည်ရွယ်ချက်: System က "ဘာလုပ်ပေးမလဲ" ဆိုတဲ့ Functional Requirement တွေကို အဓိက ဖော်ပြပါတယ်။ User တွေ လိုချင်တဲ့ လုပ်ဆောင်ချက်တွေကို System ရဲ့ အစိတ်အပိုင်းတွေ (Classes, Objects) က ဘယ်လို ပံ့ပိုးပေးသလဲ ဆိုတာ ပြသပါတယ်။
အသုံးများသော Diagram များ: Class Diagram, Object Diagram, State Diagram
ဥပမာ: E-commerce system တစ်ခုမှာ Customer, Product, Order စတဲ့ Class တွေ ဘယ်လို ဆက်စပ်နေလဲ၊ Data တွေ ဘယ်လို တည်ဆောက်ထားလဲ ဆိုတာ ပြသတာမျိုးပါ။
၂. Process View (The Concurrency View)
ပစ်မှတ်: System Integrators, Developers
ရည်ရွယ်ချက်: System ရဲ့ Runtime Behavior (အလုပ်လုပ်နေချိန် အခြေအနေ) ကို ဖော်ပြပါတယ်။ Performance, Scalability, Concurrency စတဲ့ Non-Functional Requirement တွေကို ဖြေရှင်းဖို့ Thread တွေ၊ Process တွေ ဘယ်လို အလုပ်လုပ်လဲ၊ Data တွေ ဘယ်လို စီးဆင်းလဲ ဆိုတာ ပြသပါတယ်။
အသုံးများသော Diagram များ: Sequence Diagram, Activity Diagram
ဥပမာ: Order တစ်ခု တက်လာချိန်မှာ Payment Process က Background Thread နဲ့ ဘယ်လို အလုပ်လုပ်လဲ၊ Database ထဲကို Write နေတုန်း အခြား User က Read ရင် ဘယ်လို ဖြစ်မလဲ ဆိုတာမျိုးပါ။
၃. Development View (The Implementation View)
ပစ်မှတ်: Programmers, Software Managers
ရည်ရွယ်ချက်: Software ကို ရေးသားရာမှာ Code တွေကို ဘယ်လို ဖွဲ့စည်းထားလဲ ဆိုတာ ဖော်ပြပါတယ်။ Source Code တွေ၊ Library တွေ၊ Package တွေကို ဘယ်လို စုစည်းထားလဲ (Project Structure) ဆိုတာ ပြသပါတယ်။ Teamwork နဲ့ Software Management အတွက် အရေးကြီးပါတယ်။
အသုံးများသော Diagram များ: Component Diagram, Package Diagram
ဥပမာ: BillingModule, InventoryModule, UIModule စသည်ဖြင့် Package တွေ ခွဲခြားထားပုံနဲ့ သူတို့ကြားက မှီခိုမှု (Dependency) ကို ပြသတာပါ။ "Inventory Module ပြင်လိုက်ရင် Billing Module ပါ လိုက်ပြင်ရမလား" ဆိုတာ ဒီ View မှာ ကြည့်ရပါတယ်။
၄. Physical View (The Deployment View)
ပစ်မှတ်: System Engineers, Network Administrators (DevOps)
ရည်ရွယ်ချက်: ရေးသားထားတဲ့ Software Component တွေကို Hardware (Server, Network, Cloud) ပေါ်မှာ ဘယ်လို တပ်ဆင် (Deploy) မလဲ ဆိုတာ ဖော်ပြပါတယ်။
အသုံးများသော Diagram များ: Deployment Diagram
ဥပမာ: Web Server ကို AWS EC2 ပေါ်တင်မယ်၊ Database ကို RDS မှာ ထားမယ်၊ သူတို့နှစ်ခု Private Network နဲ့ ချိတ်မယ်၊ Load Balancer ကို ရှေ့က ခံမယ် ဆိုတာမျိုး ပြသတာပါ။
၅. +1 Scenarios (The Use Case View)
ပစ်မှတ်: All Stakeholders
ရည်ရွယ်ချက်: ဒါက အထက်ပါ View ၄ ခုလုံးကို ချိတ်ဆက်ပေးတဲ့ အရာ ဖြစ်ပါတယ်။ အရေးကြီးတဲ့ Use Case တွေ (Scenarios) ကို အသုံးပြုပြီး Architecture က တကယ် အလုပ်ဖြစ်ကြောင်း သက်သေပြတာပါ။ View ၄ ခုလုံးဟာ ဒီ Scenario တွေကို ပြီးမြောက်အောင် ပံ့ပိုးပေးနိုင်ရပါမယ်။
အသုံးများသော Diagram များ: Use Case Diagram
ဥပမာ: "User တစ်ယောက် ပစ္စည်းဝယ်ယူခြင်း" ဆိုတဲ့ Scenario တစ်ခုကို ယူပြီး၊ Logical View မှာ ဘယ် Class တွေပါမလဲ၊ Process View မှာ ဘယ်လို Flow သွားမလဲ၊ Physical View မှာ ဘယ် Server တွေပါမလဲ ဆိုတာကို ရှင်းပြတာ ဖြစ်ပါတယ်။
၅.၂.၄ The C4 Model
4+1 Model က ပြည့်စုံကောင်းမွန်ပေမယ့် တစ်ခါတစ်ရံမှာ Diagram တွေ များပြားပြီး ရှုပ်ထွေးနိုင်ပါတယ်။ ဒါကြောင့် Agile Development ခေတ်စားလာတဲ့ နောက်ပိုင်းမှာ Simon Brown မိတ်ဆက်ခဲ့တဲ့ C4 Model က ပိုပြီး လူကြိုက်များလာပါတယ်။
C4 Model ရဲ့ အားသာချက်က Google Maps လိုမျိုး Zoom-in/Zoom-out လုပ်ကြည့်နိုင်တဲ့ သဘောတရား (Abstraction Levels) ပါဝင်တာပါ။ ဥပမာ ကမ္ဘာ့မြေပုံ (Context) ကနေ နိုင်ငံ (Container)၊ မြို့ (Component)၊ လမ်းမများ (Code) ဆိုပြီး အဆင့်ဆင့် ကြည့်သလိုမျိုး Software ကို ကြည့်ရှုနိုင်ပါတယ်။
C4 Model မှာ အဓိက Level ၄ ခု ရှိပါတယ်။ ဥပမာအနေနဲ့ Internet Banking System တစ်ခုကို တည်ဆောက်ပုံနဲ့ လေ့လာကြည့်ရအောင်။
Level 1: System Context Diagram (The Big Picture)
ဒါက အပေါ်စီးကနေ ကြည့်တာပါ။ ကျွန်တော်တို့ တည်ဆောက်မယ့် စနစ် (Software System) က ဘယ်သူတွေ (Users) နဲ့ ဆက်သွယ်နေလဲ၊ တခြား ဘယ် ပြင်ပစနစ် (External Systems) တွေနဲ့ ချိတ်ဆက်နေလဲ ဆိုတာ ဖော်ပြပါတယ်။
ဒီ Diagram ကို Technical မဟုတ်တဲ့ Project Manager တွေ၊ Business Owner တွေပါ နားလည်နိုင်ပါတယ်။
Banking System Example:
အောက်ကပုံမှာ User က Banking System ကို သုံးတယ်။ System ကနေ Email ပို့တာရယ်၊ ငွေစာရင်း သိမ်းထားတဲ့ Mainframe System ကြီးနဲ့ ချိတ်ဆက်တာရယ်ကို မြင်ရမှာပါ။
graph TD
    %% Actors
    Customer((Banking Customer<br/>Personal Banking User))

    %% Main System
    System[<b>Internet Banking System</b><br/>Allows customers to view accounts<br/>and make payments]

    %% External Systems
    EmailSys[E-mail System<br/>External System]
    Mainframe[Mainframe Banking System<br/>External System]

    %% Relationships
    Customer -->|Uses| System
    System -->|Sends e-mails using| EmailSys
    System -->|Gets account info from| Mainframe

    %% Styling
    style System fill:#1168bd,stroke:#0b4884,color:white
    style Customer fill:#08427b,stroke:#052e56,color:white
    style EmailSys fill:#999999,stroke:#666666,color:white
    style Mainframe fill:#999999,stroke:#666666,color:white
Level 2: Container Diagram (The High-Level Tech View)
Level 1 ကို Zoom-in လုပ်လိုက်ရင် တွေ့ရမယ့် အပိုင်းပါ။ ဒီနေရာမှာ "Container" ဆိုတာ Docker Container တစ်ခုတည်းကို ဆိုလိုတာ မဟုတ်ပါဘူး။ သီးခြား Run နိုင်တဲ့ Unit တွေ (Deployable Units) ကို ဆိုလိုတာပါ။
- Web Application: Browser မှာ run မယ့် အပိုင်း
- Mobile App: ဖုန်းထဲမှာ run မယ့် အပိုင်း
- API Application: Server ပေါ်မှာ Logic တွေ run မယ့် အပိုင်း
- Database: Data သိမ်းမယ့် အပိုင်း
Developer တွေနဲ့ Architect တွေအတွက် အရေးကြီးဆုံး Level ဖြစ်ပါတယ်။
Banking System Example:
User က Web App သို့မဟုတ် Mobile App ကနေတဆင့် API ကို လှမ်းခေါ်မယ်။ API ကမှ Database နဲ့ Mainframe ကို ဆက်သွယ်ပြီး အလုပ်လုပ်မယ်ဆိုတာ တွေ့ရမှာပါ။
graph TD
    User((Banking Customer))

    subgraph Internet Banking System [Internet Banking System Containers]
        direction TB
        WebApp[<b>Web Application</b><br/>Java/Spring MVC<br/>Delivers static content and SPA]
        MobileApp[<b>Mobile App</b><br/>Flutter<br/>Provides banking features]
        API[<b>API Application</b><br/>Java/Spring Boot<br/>Provides funtionality via JSON/HTTPS]
        DB[(<b>Database</b><br/>PostgreSQL<br/>Stores user registration info)]
    end

    EmailSys[E-mail System]
    Mainframe[Mainframe Banking System]

    %% Relationships
    User -->|Visits| WebApp
    User -->|Uses| MobileApp

    WebApp -->|Makes API calls to| API
    MobileApp -->|Makes API calls to| API

    API -->|Reads/Writes| DB
    API -->|Sends e-mail using| EmailSys
    API -->|Uses| Mainframe

    %% Styling
    style API fill:#438dd5,stroke:#333,color:white
    style WebApp fill:#438dd5,stroke:#333,color:white
    style MobileApp fill:#438dd5,stroke:#333,color:white
    style DB fill:#438dd5,stroke:#333,color:white
Level 3: Component Diagram (The Internal Structure)
Container တစ်ခု (ဥပမာ - API Application) ကို ထပ်ပြီး Zoom-in လုပ်တာပါ။ Container အတွင်းမှာရှိတဲ့ အဓိက Component တွေ (Module တွေ၊ Controller တွေ၊ Service တွေ) ဘယ်လို ဖွဲ့စည်းထားလဲ ဆိုတာ ပြသပါတယ်။
ဒါကတော့ ကုဒ်ရေးမယ့် Developer တွေအတွက် သီးသန့် ရည်ရွယ်ပါတယ်။ "Sign In Controller က Security Component ကို သုံးတယ်၊ ပြီးမှ Database ကို ဆက်သွယ်တယ်" ဆိုတာမျိုး အသေးစိတ် မြင်ရပါမယ်။
Banking System Example (API Application အတွင်းပိုင်း):
graph TD
    %% External Containers
    WebApp[Web Application]
    MobileApp[Mobile App]
    DB[(Database)]
    Mainframe[Mainframe Banking System]

    %% Internal Components of API Application
    subgraph API_App [API Application]
        SignIn[<b>Sign In Controller</b><br/>Allows users to sign in]
        Accounts[<b>Accounts Summary Controller</b><br/>Provides account overview]
        Security[<b>Security Component</b><br/>Handles Auth & Password Hashing]
        MainframeFacade[<b>Mainframe Facade</b><br/>Interface to legacy system]
    end

    %% Relationships
    WebApp -->|Uses JSON/HTTPS| SignIn
    WebApp -->|Uses JSON/HTTPS| Accounts
    MobileApp -->|Uses JSON/HTTPS| SignIn
    MobileApp -->|Uses JSON/HTTPS| Accounts

    SignIn -->|Uses| Security
    Accounts -->|Uses| MainframeFacade

    Security -->|Reads/Writes| DB
    MainframeFacade -->|Uses| Mainframe

    %% Styling
    style SignIn fill:#85bbf0,stroke:#5d82a8
    style Accounts fill:#85bbf0,stroke:#5d82a8
    style Security fill:#85bbf0,stroke:#5d82a8
    style MainframeFacade fill:#85bbf0,stroke:#5d82a8
Level 4: Code
ဒါကတော့ Component တစ်ခုရဲ့ အတွင်းပိုင်း Implementation (Class Diagram, Interface Definition) ဖြစ်ပါတယ်။ များသောအားဖြင့် ဒီအဆင့်က အရမ်းအသေးစိတ်ကျလွန်းတဲ့အတွက် အလိုအလျောက် Generate လုပ်တဲ့ Tool (IDEs) တွေကို သုံးလေ့ရှိပါတယ်။ Architecture Diagram ဆွဲရာမှာတော့ Level 3 အထိဆွဲရင် လုံလောက်ပြီလို့ ယူဆကြပါတယ်။
၅.၂.၅ Architecture Decision Records (ADRs)
Diagram တွေက စနစ်ရဲ့ "ပုံစံ" ကို ပြသနိုင်ပေမယ့် "ဘာကြောင့် ဒီပုံစံကို ရွေးချယ်ခဲ့တာလဲ" ဆိုတဲ့ အကြောင်းပြချက်ကိုတော့ မပြောပြနိုင်ပါဘူး။ ဥပမာ - Level 2 Diagram မှာ Database ကို PostgreSQL သုံးမယ်လို့ ပြထားပေမယ့်၊ ဘာကြောင့် MySQL မသုံးဘဲ PostgreSQL သုံးရတာလဲ ဆိုတဲ့ အကြောင်းပြချက် မရှိပါဘူး။
ဒါကြောင့် ခေတ်မီ Software Team တွေမှာ Architecture Decision Records (ADRs) ကို အသုံးပြုကြပါတယ်။ ဒါက အရေးကြီးတဲ့ ဆုံးဖြတ်ချက်တွေကို မှတ်တမ်းတင်ထားတဲ့ Document (Markdown file) လေးတွေပါ။
ADR တစ်ခုမှာ ပုံမှန်အားဖြင့် အောက်ပါ အချက်တွေ ပါဝင်ပါတယ်။
- Title: ဆုံးဖြတ်ချက် ခေါင်းစဉ် (ဥပမာ - "Use PostgreSQL instead of MySQL")
- Status: အခြေအနေ (Proposed, Accepted, Deprecated)
- Context: ဘာပြဿနာ ဖြစ်နေလဲ။ ဘာရွေးချယ်စရာတွေ ရှိလဲ။ (ဥပမာ - We need JSON support and complex queries)
- Decision: ဘာကို ရွေးချယ်လိုက်လဲ။ (We will use PostgreSQL)
- Consequences: ဒီဆုံးဖြတ်ချက်ကြောင့် ဘာကောင်းကျိုးတွေ ရမလဲ၊ ဘာဆိုးကျိုး (Tradeoffs) တွေ ရှိလာမလဲ။
ADR တွေကို သိမ်းဆည်းထားခြင်းအားဖြင့် နောက်ရောက်လာတဲ့ Developer တွေအနေနဲ့ "ဘာလို့ ဒီလို ရေးထားတာလဲ" ဆိုတာကို ရှင်းရှင်းလင်းလင်း နားလည်နိုင်မှာ ဖြစ်ပါတယ်။
၅.၂.၆ Important Architectural Laws
Software Architecture လောကမှာ "Software ရဲ့ ရူပဗေဒ နိယာမများ" လို့ တင်စားခေါ်ဝေါ်ကြတဲ့ စည်းမျဉ်းတွေ ရှိပါတယ်။ ဒီနိယာမတွေကို နားလည်ထားခြင်းက ဒီဇိုင်းအမှား (Design Flaws) တွေကို ကြိုတင် ရှောင်ရှားနိုင်ဖို့ ကူညီပေးပါလိမ့်မယ်။
၁. Conway's Law (Organization vs. Architecture)
"Any organization that designs a system will produce a design whose structure is a copy of the organization's communication structure." — Melvin Conway
ဆိုလိုရင်း:
System တစ်ခုကို Design လုပ်တဲ့ အဖွဲ့အစည်းတွေဟာ သူတို့ရဲ့ ဖွဲ့စည်းပုံ (Organization Structure) နဲ့ ပုံစံတူတဲ့ Design တွေကိုသာ ထုတ်လုပ်လေ့ရှိတယ် ဆိုတဲ့ နိယာမ ပါ။
ဥပမာ:
သင့်ကုမ္ပဏီမှာ Frontend Team နဲ့ Backend Team ဆိုပြီး သီးသန့်ခွဲထားရင်၊ သင့်ရဲ့ Software Architecture ကလည်း Frontend နဲ့ Backend တိတိကျကျ ကွဲနေတဲ့ ပုံစံ ဖြစ်လာပါလိမ့်မယ်။ အကယ်၍ Team ၄ ခု ခွဲပြီး Compiler တစ်ခုကို ရေးခိုင်းရင်၊ 4-pass Compiler ထွက်လာဖို့ သေချာသလောက် ရှိပါတယ်။
Architect တစ်ယောက်အနေနဲ့ ဘာလုပ်ရမလဲ:
လိုချင်တဲ့ Architecture ပုံစံ (ဥပမာ - Microservices) ရှိရင်၊ အဖွဲ့အစည်း ဖွဲ့စည်းပုံကို အရင် ပြောင်းလဲဖို့ လိုကောင်း လိုပါလိမ့်မယ်။ ဒါကို Inverse Conway Maneuver လို့ ခေါ်ပါတယ်။
graph TD
    subgraph Organization
        TeamA[Team A] <-->|Communicates| TeamB[Team B]
    end

    subgraph Software_Architecture
        ModuleA[Module A] <-->|API Calls| ModuleB[Module B]
    end

    Organization -.->|Influences| Software_Architecture

    style TeamA fill:#f9f,stroke:#333
    style TeamB fill:#f9f,stroke:#333
    style ModuleA fill:#9ff,stroke:#333
    style ModuleB fill:#9ff,stroke:#333
၂. CAP Theorem (Distributed Systems Dilemma)
Distributed Data Store (Server အများကြီးဖြန့်ထားတဲ့ Database) တစ်ခုမှာ အောက်ပါ ၃ ချက်ထဲက ၂ ချက် ကိုသာ တစ်ပြိုင်နက် ရရှိနိုင်ပါတယ်။ ၃ ခုလုံး တပြိုင်နက် ရဖို့ မဖြစ်နိုင်ပါဘူး။
- Consistency (C): Server အားလုံးမှာ Data တူညီနေရမယ် (နောက်ဆုံး ပြင်လိုက်တဲ့ Data ကိုပဲ မြင်ရမယ်)။
- Availability (A): Server တစ်လုံး ပျက်နေရင်တောင် အမြဲတမ်း တုံ့ပြန်မှု (Response) ရနေရမယ်။
- Partition Tolerance (P): Network ပြတ်တောက်မှု (Network Failure) ဖြစ်နေရင်တောင် စနစ်က ဆက်လက် အလုပ်လုပ်နိုင်ရမယ်။
Distributed System ဆိုတာ Network ပေါ်မှာ တည်ဆောက်ထားတာဖြစ်လို့ Network ပြတ်တောက်မှု (Partition) က ရှောင်လွှဲမရပါဘူး။ ဒါကြောင့် (P) က မဖြစ်မနေ ယူရမှာ ဖြစ်ပြီး၊ ကျန်တဲ့ (C) နဲ့ (A) ထဲက တစ်ခုကိုပဲ ရွေးချယ်ခွင့် ရှိပါတော့တယ်။
- CP (Consistency + Partition Tolerance): Banking System မျိုးပါ။ Data မငြိမ်မချင်း (Network ကျနေရင်) အလုပ်လုပ်မခံပါဘူး။ (Data မှန်ဖို့ အဓိက)
- AP (Availability + Partition Tolerance): Social Media မျိုးပါ။ လိုင်းကျနေလည်း Post တင်လို့ ရနေမယ်၊ သူများတင်တာ မြင်နေရမယ်။ Data နည်းနည်း နောက်ကျတာ ကိစ္စမရှိပါဘူး။ (သုံးလို့ရဖို့ အဓိက)
graph TD
    C((Consistency)) --- A((Availability))
    A --- P((Partition Tolerance))
    P --- C

    linkStyle 0 stroke:red,stroke-width:4px;
    linkStyle 1 stroke:green,stroke-width:4px;
    linkStyle 2 stroke:blue,stroke-width:4px;
(မှတ်ချက် - မျဉ်းကြောင်း တစ်ခုကိုပဲ ရွေးလို့ရတဲ့ သဘောပါ)
၃. Gall's Law (Complexity Evolution)
"A complex system that works is invariably found to have evolved from a simple system that worked." — John Gall
ဆိုလိုရင်း:
ရှုပ်ထွေးပြီး အလုပ်ဖြစ်တဲ့ စနစ်ကြီးတွေဟာ ရိုးရှင်းပြီး အလုပ်ဖြစ်တဲ့ စနစ်လေးတွေကနေ တဖြည်းဖြည်း ပြောင်းလဲတိုးတက်လာတာ ဖြစ်ပါတယ်။ အစကတည်းက ရှုပ်ထွေးတဲ့ စနစ်ကြီးတစ်ခုကို တည်ဆောက်ဖို့ ကြိုးစားရင် အလုပ်မဖြစ်ဘဲ ကျဆုံးဖို့ များပါတယ်။
Architect တစ်ယောက်အနေနဲ့ ဘာလုပ်ရမလဲ:
Microservices တွေ၊ ရှုပ်ထွေးတဲ့ Architecture တွေနဲ့ စတင်မယ့်အစား၊ MVP (Minimum Viable Product) သို့မဟုတ် ရိုးရှင်းတဲ့ Monolithic နဲ့ စတင်ပါ။ အလုပ်ဖြစ်မှ တဖြည်းဖြည်း ချဲ့ထွင် (Scale) ပါ။
၄. Murphy's Law (Design for Failure)
"Anything that can go wrong will go wrong."
ဆိုလိုရင်း:
မှားယွင်းနိုင်တဲ့ အရာမှန်သမျှဟာ တစ်ချိန်ချိန်မှာ မုချ မှားယွင်းပါလိမ့်မယ်။ Server တွေ မီးပျက်နိုင်တယ်၊ Hard Disk ပျက်နိုင်တယ်၊ Network ပြတ်နိုင်တယ်။
Architect တစ်ယောက်အနေနဲ့ ဘာလုပ်ရမလဲ:
Software Architecture ကို "အရာအားလုံး အဆင်ပြေနေမယ် (Happy Path)" လို့ ယူဆပြီး မဆွဲပါနဲ့။ "အရာအားလုံး ပျက်စီးနိုင်တယ်" လို့ ယူဆပြီး Fault Tolerance (အပျက်အစီး ခံနိုင်ရည်ရှိမှု)၊ Redundancy (အပိုဆောင်း စနစ်များ) နဲ့ Circuit Breaker တွေကို ထည့်သွင်း စဉ်းစားရပါမယ်။
၅.၃ Classic Architectural Patterns
Architecture တစ်ခုကို အစကနေ အသစ်တီထွင်စရာ မလိုပါဘူး။ နှစ်ပေါင်းများစွာကတည်းက သက်သေပြပြီးသား Classic Patterns တွေကို နားလည်ထားရင် ကိုယ့် System နဲ့ ကိုက်ညီမယ့် ပုံစံကို ရွေးချယ်နိုင်မှာ ဖြစ်ပါတယ်။
၅.၃.၁ Layered Architecture (N-Tier)
Software ကို အလွှာ (Layers) တွေအဖြစ် ဖွဲ့စည်းတည်ဆောက်တာ ဖြစ်ပါတယ်။ ဒါက အသုံးအများဆုံးနဲ့ "General Purpose" အဖြစ်ဆုံး Pattern ပါ။ အလွှာတစ်ခုဟာ သူ့အောက်က အလွှာကိုပဲ ဆက်သွယ်ခွင့်ရှိပါတယ်။
graph TD
    A[Presentation Layer<br/>UI/API] --> B[Business Logic Layer<br/>Domain Rules]
    B --> C[Persistence Layer<br/>Database Access]
    C --> D[Database<br/>SQL/NoSQL]

    style A fill:#f9f,stroke:#333
    style B fill:#bbf,stroke:#333
    style C fill:#bfb,stroke:#333
    style D fill:#ddd,stroke:#333
- Presentation Layer: User နဲ့ အပြန်အလှန် ဆက်သွယ်တဲ့ အပိုင်း (UI သို့မဟုတ် API Endpoints)။
- Business Logic Layer: Application ရဲ့ အဓိက စည်းမျဉ်းစည်းကမ်းတွေကို ကိုင်တွယ်ပါတယ်။
- Persistence Layer: Database နဲ့ ဆက်သွယ်ပြီး Data တွေကို ရယူ/သိမ်းဆည်း ပေးပါတယ်။
- Database: Data တွေကို သိမ်းဆည်းပါတယ်။
Tradeoffs:
- Pros: နားလည်ရ လွယ်ကူတယ်။ Test လုပ်ရလွယ်တယ်။ (Separation of Concerns ရှိလို့)။
- Cons: "Sinkhole Anti-pattern" ဖြစ်နိုင်တယ်။ (တချို့ Request တွေက Logic ဘာမှ မရှိဘဲ အလွှာတွေသာ ဖြတ်သွားပြီး Performance ကျစေတာမျိုး)။
၅.၃.၂ Model-View-Controller (MVC) family
Interactive Application တွေ (Web & Mobile) အတွက် Standard ဖြစ်နေတဲ့ Pattern ပါ။ UI နဲ့ Logic ကို ရောမနေအောင် ခွဲထုတ်ထားတာပါ။
sequenceDiagram
    participant User
    participant View
    participant Controller
    participant Model

    User->>View: 1. User Action (Click)
    View->>Controller: 2. Send Input
    Controller->>Model: 3. Update Data
    Model-->>View: 4. Notify Change / Data Update
    View->>User: 5. Render New UI
- Model: Application ရဲ့ Data နဲ့ Business Logic (State) ကို ကိုင်တွယ်ပါတယ်။
- View: Data ကို User ဆီ ပြသပေးတဲ့ အပိုင်း (UI) ပါ။
- Controller: User Input ကို လက်ခံပြီး Model နဲ့ View ကို ညွှန်ကြားပေးသူပါ။
Variants:
- MVP (Model-View-Presenter): Android Development အစောပိုင်းကာလတွေမှာ သုံးခဲ့ပါတယ်။ Controller အစား Presenter က View ကို တိုက်ရိုက် Update လုပ်ပါတယ်။
- MVVM (Model-View-ViewModel): Modern Frontend Frameworks (React, Vue, Angular) နဲ့ Mobile (SwiftUI, Jetpack Compose) မှာ သုံးပါတယ်။ Data Binding ကို အဓိကထားပါတယ်။
၅.၃.၃ Microkernel Architecture (Plug-in Architecture)
ဒါက System ကို Core နဲ့ Plug-in ဆိုပြီး ခွဲခြားတည်ဆောက်တာပါ။ အပို Feature တွေကို System ပြင်စရာမလိုဘဲ ထပ်ထည့်ချင်တဲ့အခါ သုံးပါတယ်။
ဥပမာ: VS Code, Eclipse, Chrome Browser (Extensions), Wordpress.
graph TD
    subgraph System
        Core[<b>Core System</b><br/>Minimal Logic]
        P1[Plugin A]
        P2[Plugin B]
        P3[Plugin C]
    end

    P1 <-->|API| Core
    P2 <-->|API| Core
    P3 <-->|API| Core

    style Core fill:#ff9999,stroke:#333,stroke-width:2px
Tradeoffs:
- Pros: Extensibility (တိုးချဲ့နိုင်စွမ်း) အရမ်းကောင်းတယ်။ Core က သေးငယ်ပြီး မြန်ဆန်တယ်။
- Cons: Plugin တွေအချင်းချင်း စကားပြောဖို့ ခက်ခဲတယ်။ Version Control လုပ်ရ ခက်နိုင်တယ်။
၅.၃.၄ Pipe-and-Filter Architecture
Data တွေကို အဆင့်ဆင့် ပြုပြင်ပြောင်းလဲဖို့ လိုအပ်တဲ့အခါ သုံးပါတယ်။ Component တစ်ခုရဲ့ Output ဟာ နောက် Component တစ်ခုရဲ့ Input ဖြစ်သွားပါတယ်။
ဥပမာ: Compiler (Lexer -> Parser -> Semantic Analyzer -> Code Generator)၊ Unix Commands (ls | grep | sort)၊ Video Processing Tools။
graph LR
    Source((Input)) -->|Raw Data| Filter1[Filter A]
    Filter1 -->|Transformed| Filter2[Filter B]
    Filter2 -->|Transformed| Filter3[Filter C]
    Filter3 -->|Final Data| Sink((Output))

    style Filter1 fill:#cfc,stroke:#333
    style Filter2 fill:#cfc,stroke:#333
    style Filter3 fill:#cfc,stroke:#333
Tradeoffs:
- Pros: Reusability ကောင်းတယ်။ (Filter တွေကို ဖြုတ်တပ်၊ နေရာလဲ လို့ရတယ်)။
- Cons: Interactive System (User နဲ့ အပြန်အလှန်လုပ်ရတဲ့ စနစ်) တွေအတွက် မသင့်တော်ဘူး။
၅.၃.၅ Master-Slave Architecture
အလုပ်တွေကို ထိန်းချုပ်မယ့်သူ (Master) နဲ့ လုပ်ဆောင်မယ့်သူ (Slave/Worker) ဆိုပြီး ခွဲခြားထားတာပါ။ Database Replication တွေနဲ့ Background Job System တွေမှာ တွေ့ရများပါတယ်။
- Master: အမိန့်ပေးတယ်၊ Write Operation တွေကို လက်ခံတယ်။
- Slaves: အမိန့်နာခံတယ်၊ Read Operation တွေကို လုပ်ပေးတယ်။
Tradeoffs:
- Pros: Read Performance ကောင်းတယ်။ (User အများကြီး ဖတ်တာကို Slave တွေက မျှဝေလုပ်ပေးနိုင်တယ်)။
- Cons: Master ပျက်သွားရင် (Single Point of Failure) စနစ်တစ်ခုလုံး ရပ်သွားနိုင်တယ်။ Data Consistency ညှိရတာ ခက်နိုင်တယ်။
ဒီ Pattern တွေက Classic ဖြစ်တဲ့အတွက် ယနေ့ထက်ထိ နေရာအတော်များများမှာ အခြေခံအဖြစ် ရှိနေဆဲပါ။ နောက်ပိုင်း ပေါ်လာတဲ့ Modern Architecture (Microservices, Serverless) တွေကလည်း ဒီ Pattern တွေကို အခြေခံပြီး တိုးချဲ့ထားတာ ဖြစ်ပါတယ်။
၅.၄ Modern Architectural Styles
Cloud Computing နဲ့ Distributed System တွေ ခေတ်စားလာတာနဲ့အမျှ Architecture ပုံစံတွေကလည်း ပိုပြီး Flexible ဖြစ်လာပါတယ်။ Monolithic ကနေ ခွဲထွက်ပြီး Scale လုပ်လို့ကောင်းမယ့် ပုံစံတွေကို ဦးစားပေးလာကြပါတယ်။
၅.၄.၁ Microservices Architecture
Application ကြီးတစ်ခုလုံးကို Monolith တည်ဆောက်မယ့်အစား၊ သေးငယ်ပြီး လွတ်လပ်တဲ့ Service လေးတွေအဖြစ် ခွဲခြမ်းတည်ဆောက်တာ ဖြစ်ပါတယ်။ Service တစ်ခုချင်းစီဟာ Specific Business Capability (ဥပမာ - Order, Payment, User) တစ်ခုကိုပဲ တာဝန်ယူပြီး၊ သူတို့ရဲ့ ကိုယ်ပိုင် Database သီးသန့် ရှိတတ်ကြပါတယ်။
graph TD
    Client[Client Apps] --> GW[API Gateway]

    subgraph Backend [Microservices Ecosystem]
        direction TB
        GW --> S1[<b>User Service</b><br/>Node.js]
        GW --> S2[<b>Order Service</b><br/>Java]
        GW --> S3[<b>Payment Service</b><br/>Go]

        S1 --- DB1[(User DB)]
        S2 --- DB2[(Order DB)]
        S3 --- DB3[(Payment DB)]

        S2 -.->|Sync/Async Calls| S3
    end

    style GW fill:#f96,stroke:#333
    style S1 fill:#69c,stroke:#333
    style S2 fill:#69c,stroke:#333
    style S3 fill:#69c,stroke:#333
Tradeoffs:
- Pros:
- Scalability: Order Service ကို လူသုံးများရင် အဲ့ဒီ Service တစ်ခုတည်းကိုပဲ Server ထပ်တိုးလို့ရတယ်။
- Technology Freedom: Service တစ်ခုကို Java နဲ့ ရေးပြီး နောက်တစ်ခုကို Node.js နဲ့ ရေးလို့ရတယ်။
- Resilience: Service တစ်ခု ကျသွားရင် ကျန်တာတွေ ဆက်အလုပ်လုပ်နိုင်တယ်။
- Cons:
- Complexity: Distributed System ဖြစ်သွားတဲ့အတွက် Manage လုပ်ရတာ အရမ်းခက်ခဲသွားတယ်။
- Data Consistency: Database တွေ ကွဲသွားတဲ့အတွက် Data ညီညွတ်ဖို့ (Transaction) ထိန်းရတာ ခက်ခဲပါတယ်။ (Saga Pattern လိုမျိုး သုံးရတတ်ပါတယ်)။
၅.၄.၂ Event-Driven Architecture (EDA)
Component တွေက တိုက်ရိုက် ချိတ်ဆက် (Direct Call) မလုပ်ဘဲ၊ Event တွေကို Publish နဲ့ Subscribe ဖြင့် သွယ်ဝိုက် ဆက်သွယ်ကြပါတယ်။ "Order တက်လာပြီ" လို့ အော်ပြောလိုက်ရင် (Event)၊ သက်ဆိုင်ရာ Payment Service က ကြားပြီး ငွေဖြတ်မယ်၊ Inventory Service က ကြားပြီး ပစ္စည်းစာရင်း ဖြတ်မယ်။
graph LR
    Producer[Order Service<br/>Producer] -- Event: OrderCreated --> Broker((Event Broker<br/>Kafka/RabbitMQ))

    Broker -- Pushes to --> Con1[Payment Service<br/>Consumer A]
    Broker -- Pushes to --> Con2[Inventory Service<br/>Consumer B]
    Broker -- Pushes to --> Con3[Notification Service<br/>Consumer C]

    style Broker fill:#ff9,stroke:#333,stroke-width:2px
Tradeoffs:
- Pros:
- Decoupling: Producer က Consumer အကြောင်း သိစရာမလိုပါဘူး။
- Asynchronous: User ကို စောင့်ခိုင်းစရာမလိုဘဲ နောက်ကွယ်မှာ အလုပ်လုပ်နိုင်တယ်။
- Cons:
- Debugging: Error တက်ရင် ဘယ်နားမှာ မှားနေလဲ လိုက်ရှာဖို့ (Trace) ခက်ခဲပါတယ်။
၅.၄.၃ Serverless Architecture (Function-as-a-Service)
Server တွေကို ကိုယ်တိုင် စီမံခန့်ခွဲရန်မလိုဘဲ Cloud Provider တွေရဲ့ Service (ဥပမာ - AWS Lambda, Google Cloud Functions) ကို သုံးပြီး Code ကိုပဲ Upload တင်လိုက်တာပါ။ Request ဝင်လာမှသာ Function က နိုးထပြီး အလုပ်လုပ်ပါတယ်။
Tradeoffs:
Pros:
- Cost: အသုံးပြုမှသာ ပိုက်ဆံပေးရပါတယ် (Pay-as-you-go)။ Request မရှိရင် ပိုက်ဆံမကုန်ပါဘူး။
- No Ops: Server Patching, Scaling ကိစ္စတွေ ခေါင်းစားစရာ မလိုပါဘူး။
Cons:
- Cold Start: အကြာကြီးနေမှ Request ဝင်လာရင် Function နိုးဖို့ အချိန်နည်းနည်း စောင့်ရတတ်ပါတယ်။
- Vendor Lock-in: Cloud Provider တစ်ခုအပေါ် အရမ်းမှီခိုသွားတတ်ပါတယ်။
၅.၄.၄ Service-Oriented Architecture (SOA)
Microservices ရဲ့ ရှေ့ပြေးပုံစံလို့ ပြောလို့ရပေမယ့် ကွာခြားချက်ရှိပါတယ်။ SOA က လုပ်ငန်းကြီးတစ်ခုလုံး (Enterprise) မှာရှိတဲ့ မတူညီတဲ့ System ကြီးတွေ (Billing System, HR System) ကို Enterprise Service Bus (ESB) ကနေတဆင့် ချိတ်ဆက်ပြီး ပြန်လည်အသုံးပြုဖို့ (Reusability) ကို ဦးစားပေးပါတယ်။
- Microservices: "Dumb pipes, Smart endpoints" (Bus က ဘာမှမလုပ်ဘူး၊ Logic က Service မှာရှိတယ်)
- SOA: "Smart pipes, Dumb endpoints" (Logic အတော်များများက ESB မှာ ရှိတတ်တယ်)
ဒီပုံမှာ ကြည့်လိုက်ရင် Billing System က Java နဲ့ ရေးထားမယ်၊ HR System က ရှေးဟောင်း Mainframe ကြီး ဖြစ်မယ်။ ဒါပေမဲ့ ESB က ကြားခံပြီး "စကားပြန် (Translator)" အဖြစ် ဆောင်ရွက်ပေးတဲ့အတွက် သူတို့အချင်းချင်း ချိတ်ဆက်လို့ ရသွားပါတယ်။
graph TD
    Consumer[Consumer Apps<br/>Web / Mobile / Partners]

    subgraph Middleware [The Smart Pipe]
        ESB{{Enterprise Service Bus ESB<br/>Routing, Transformation, Security}}
    end

    subgraph Enterprise_Services [Backend Systems]
        S1[Billing System<br/>Java / SOAP]
        S2[Legacy HR System<br/>Mainframe]
        S3[CRM System<br/>.NET / REST]
    end

    Consumer -->|Unified Request| ESB
    ESB <-->|Translates Protocol| S1
    ESB <-->|Translates Protocol| S2
    ESB <-->|Translates Protocol| S3

    style ESB fill:#f96,stroke:#333,stroke-width:4px
    style S1 fill:#ddd,stroke:#333
    style S2 fill:#ddd,stroke:#333
    style S3 fill:#ddd,stroke:#333
SOA ၏ အဓိက လက္ခဏာများ (Key Characteristics)
၁။ Enterprise Service Bus (ESB): ဒါက "Smart Pipe" ပါ။ ESB ဟာ Data တွေကို ပို့ဆောင်ပေးရုံသာမက Data ပုံစံပြောင်းပေးခြင်း (Transformation)၊ လမ်းကြောင်းရွေးပေးခြင်း (Routing) နဲ့ Business Logic အချို့ကိုပါ ကိုင်တွယ်ပါတယ်။ (ဥပမာ - XML ကနေ JSON ပြောင်းပေးတာမျိုးပါ)။
၂။ Protocol Independence: Backend မှာရှိတဲ့ System တွေက ကြိုက်တဲ့ ဘာသာစကား (Java, .NET, COBOL)၊ ကြိုက်တဲ့ Protocol (SOAP, REST, FTP) ကို သုံးလို့ရပါတယ်။ ESB က အားလုံးကို နားလည်အောင် ညှိပေးပါတယ်။
၃။ Reusability: HR System ထဲက "ဝန်ထမ်းလစာ တွက်ချက်ခြင်း" ဆိုတဲ့ Function ကို Billing System ကလည်း ယူသုံးလို့ရသလို၊ Mobile App ကလည်း ယူသုံးလို့ရအောင် Service အဖြစ် ထုတ်ပေးထားတာပါ။
SOA vs. Microservices ကွာခြားချက်
လူတော်တော်များများက SOA နဲ့ Microservices ကို ဆင်တူတယ်လို့ ထင်ကြပါတယ်။ အဓိက ကွာခြားချက်ကတော့ "Logic ဘယ်မှာထားလဲ" ဆိုတာပါပဲ။
Tradeoffs:
- Pros: Enterprise Level မှာ System တွေအများကြီးကို ချိတ်ဆက်ဖို့ ကောင်းပါတယ်။
- Cons: ESB က အရမ်းကြီးမားလေးလံပြီး (Bottleneck) ဖြစ်လာတတ်ပါတယ်။
၅.၄.၅ API-First Design & Cloud-Native
ဒါက Architecture Style ထက် Development Philosophy (ဒဿန) ပိုဆန်ပါတယ်။
API-First: Code မရေးခင် API Spec (OpenAPI/Swagger) ကို အရင် ဒီဇိုင်းဆွဲပါတယ်။ ဒါမှ Frontend နဲ့ Backend အပြိုင် ရေးလို့ရမှာပါ။ REST အပြင် အခုနောက်ပိုင်း GraphQL နဲ့ gRPC တို့ကိုလည်း တွင်ကျယ်စွာ သုံးလာကြပါတယ်။
Cloud-Native: Cloud ပေါ်မှာ run ဖို့ သီးသန့်ရည်ရွယ်ပြီး ဒီဇိုင်းဆွဲတာပါ။ The Twelve-Factor App နည်းလမ်းတွေကို လိုက်နာပြီး Container (Docker/Kubernetes) တွေနဲ့ တည်ဆောက်ကြပါတယ်။
၅.၅ Object-Oriented Design Principles
Software Architecture က အိမ်တစ်လုံး၏ ပုံစံဖြစ်လျှင်၊ OO Design Principles များသည် အိမ်ဆောက်ရာတွင် အသုံးပြုသည့် အုတ်တစ်ချပ်ချင်းစီကို မည်သို့ စီမံမည်နည်း ဆိုသည့် စည်းမျဉ်းများ ဖြစ်ပါသည်။ Code များ ရှုပ်ထွေးမနေစေရန်နှင့် ပြင်ဆင်ရ လွယ်ကူစေရန် ဤစည်းမျဉ်းများကို လိုက်နာသင့်ပါသည်။
၅.၅.၁ SOLID Principles
Robert C. Martin (Uncle Bob) စုစည်းပေးခဲ့သော ဤစည်းမျဉ်း ၅ ခုသည် OOP ၏ အခြေခံအကျဆုံး စည်းမျဉ်းများ ဖြစ်ပါသည်။
1. S - Single Responsibility Principle (SRP)
"A class should have one, and only one, reason to change."
Class တစ်ခုတွင် တာဝန်တစ်ခုတည်းသာ ရှိသင့်ပါသည်။ တာဝန်များနေလျှင် Class သည် ကြီးမားရှုပ်ထွေးပြီး ပြင်ဆင်ရ ခက်ခဲတတ်ပါသည်။
ဥပမာ: User အချက်အလက်ကို သိမ်းဆည်းခြင်းနှင့် Email ပို့ခြင်းကို Class တစ်ခုတည်းတွင် မလုပ်သင့်ပါ။
Java:
// Bad: One class doing two things
class UserService {
    public void registerUser(String username) {
        // Save user logic...
        // Send email logic...
    }
}

// Good: Split responsibilities
class UserRepository {
    public void save(String username) { /* Save logic */ }
}

class EmailService {
    public void sendWelcomeEmail(String username) { /* Email logic */ }
}
TypeScript:
// Bad
class UserService {
    registerUser(username: string): void {
        // Save user logic...
        // Send email logic...
    }
}

// Good
class UserRepository {
    save(username: string): void { /* Save logic */ }
}

class EmailService {
    sendWelcomeEmail(username: string): void { /* Email logic */ }
}
2. O - Open/Closed Principle (OCP)
"Software entities should be open for extension, but closed for modification."
Feature အသစ်ထည့်လိုလျှင် ရှိပြီးသား Code အဟောင်းကို သွားမပြင်ဘဲ၊ Code အသစ် ထပ်ဖြည့်သည့် နည်းဖြင့် လုပ်ဆောင်နိုင်ရပါမည်။
ဥပမာ: Payment စနစ်တွင် Payment Method အသစ်တိုးတိုင်း PaymentProcessor class ကို လိုက်ပြင်နေရလျှင် OCP ကို ချိုးဖောက်ရာ ရောက်ပါသည်။
Java:
// Good: Use Interface (Polymorphism)
interface PaymentMethod {
    void pay(double amount);
}

class MPUPayment implements PaymentMethod {
    public void pay(double amount) { System.out.println("Paid via MPU"); }
}

class WavePayment implements PaymentMethod {
    public void pay(double amount) { System.out.println("Paid via Wave"); }
}

class PaymentProcessor {
    // New payment methods can be added without changing this code
    public void process(PaymentMethod method, double amount) {
        method.pay(amount);
    }
}
TypeScript:
// Good
interface PaymentMethod {
    pay(amount: number): void;
}

class MPUPayment implements PaymentMethod {
    pay(amount: number): void { console.log("Paid via MPU"); }
}

class WavePayment implements PaymentMethod {
    pay(amount: number): void { console.log("Paid via Wave"); }
}

class PaymentProcessor {
    process(method: PaymentMethod, amount: number): void {
        method.pay(amount);
    }
}
3. L - Liskov Substitution Principle (LSP)
"Objects of a superclass shall be replaceable with objects of its subclasses without breaking the application."
Parent Class နေရာတွင် Child Class ကို အစားထိုး အသုံးပြုသည့်အခါ Program တွင် Error မတက်သင့်ပါ။
ပြဿနာ: Bird (ငှက်) class တွင် fly() method ပါသည်။ Penguin (ပင်ဂွင်း) က Bird ကို extend လုပ်ထားသော်လည်း ပျံ၍မရပါ။ Program က Bird ဟု ထင်ပြီး fly() ခေါ်လိုက်လျှင် Error တက်မည်။ ၎င်းသည် LSP ကို ချိုးဖောက်ခြင်း ဖြစ်သည်။
4. I - Interface Segregation Principle (ISP)
"Clients should not be forced to depend upon interfaces that they do not use."
လိုအပ်သည်ထက် ပိုပါနေသည့် Interface ကြီး (Fat Interface) တစ်ခုတည်း လုပ်မည့်အစား၊ သေးငယ်တိကျသည့် Interface လေးများ ခွဲထုတ်သင့်ပါသည်။
ဥပမာ: Worker interface တွင် work() နှင့် eat() ပါဝင်သည်။ Robot က Worker ကို implement လုပ်လျှင် eat() method က အပိုဖြစ်နေပြီး မလိုအပ်ဘဲ implement လုပ်ပေးနေရသည်။
Java:
// Bad
interface Worker {
    void work();
    void eat();
}

// Good: Segregate Interfaces
interface Workable {
    void work();
}

interface Eatable {
    void eat();
}

class Robot implements Workable {
    public void work() { /* Working */ }
    // No need to implement eat()
}
TypeScript:
// Bad
interface Worker {
    work(): void;
    eat(): void;
}

// Good
interface Workable {
    work(): void;
}

interface Eatable {
    eat(): void;
}

class Robot implements Workable {
    work(): void { /* Working */ }
}
5. D - Dependency Inversion Principle (DIP)
"High-level modules should not depend on low-level modules. Both should depend on abstractions."
High-level Module များက Low-level Module များကို တိုက်ရိုက် မှီခိုမည့်အစား၊ Interface များကိုသာ မှီခိုသင့်ပါသည်။
ဥပမာ: Switch (High-level) သည် LightBulb (Low-level) ကို တိုက်ရိုက် သိစရာ မလိုပါ။ SwitchableDevice ဆိုသည့် Interface ကိုသာ သိလျှင် မီးသီးပဲဖြစ်ဖြစ်၊ ပန်ကာပဲဖြစ်ဖြစ် ဖွင့်/ပိတ် လုပ်နိုင်ပါမည်။
Java:
// Abstraction
interface Switchable {
    void turnOn();
    void turnOff();
}

// Low-level module
class LightBulb implements Switchable {
    public void turnOn() { /* Light on */ }
    public void turnOff() { /* Light off */ }
}

// High-level module
class ElectricSwitch {
    private Switchable device; // Depends on interface, not specific class

    public ElectricSwitch(Switchable device) {
        this.device = device;
    }

    public void press() {
        device.turnOn();
    }
}
TypeScript:
// Abstraction
interface Switchable {
    turnOn(): void;
    turnOff(): void;
}

// Low-level module
class LightBulb implements Switchable {
    turnOn(): void { /* Light on */ }
    turnOff(): void { /* Light off */ }
}

// High-level module
class ElectricSwitch {
    private device: Switchable;

    constructor(device: Switchable) {
        this.device = device;
    }

    press(): void {
        this.device.turnOn();
    }
}
၅.၅.၂ DRY, KISS, and YAGNI
- DRY (Don't Repeat Yourself): Code Copy-Paste လုပ်ခြင်းကို ရှောင်ကြဉ်ပါ။ Logic တစ်ခုကို နေရာတစ်ခုတည်းတွင်သာ ရေးသားပါ။ ပြင်ဆင်ရန် လိုအပ်ပါက တစ်နေရာတည်းတွင် ပြင်ဆင်ရုံဖြင့် ပြီးပြည့်စုံစေရန် ဖြစ်သည်။
- KISS (Keep It Simple, Stupid): မလိုအပ်ဘဲ ရှုပ်ထွေးအောင် မရေးပါနှင့်။ ရိုးရှင်းသော Solution သည် အကောင်းဆုံး ဖြစ်သည်။ Debugging လုပ်ရလွယ်ကူစေသည်။
- YAGNI (You Ain't Gonna Need It): လက်ရှိ မလိုအပ်သေးသော Feature များကို "နောင်လိုမလားမသိဘူး" ဟု တွေးပြီး ကြိုတင် ထည့်သွင်း ရေးသားခြင်းကို ရှောင်ကြဉ်ပါ။
၅.၅.၃ Law of Demeter (Principle of Least Knowledge)
Object တစ်ခုသည် ၎င်းနှင့် တိုက်ရိုက် ဆက်စပ်နေသော Object များကိုသာ ဆက်သွယ်သင့်ပါသည်။ "သူစိမ်းများ" နှင့် စကားမပြောသင့်ပါ။ ၎င်းသည် Coupling ကို လျှော့ချပေးပါသည်။
ရိုးရှင်းစွာမှတ်ရန်မှာ - "ကွင်း (dot) တစ်ခုထက် ပိုမဆက်ပါနှင့်" ဟု ဆိုလိုခြင်း ဖြစ်သည်။
Java:
// Bad: Law of Demeter Violation
order.getCustomer().getAddress().getCity();

// Good
order.getCustomerCity();
TypeScript:
// Bad
order.customer.address.city;

// Good
order.getCustomerCity();
၅.၅.၄ Composition over Inheritance
OOP တွင် Inheritance (Extends) ကို အလွန်အကျွံ သုံးခြင်းသည် Code ကို ပြောင်းလွယ်ပြင်လွယ် မရှိဖြစ်စေတတ်ပါသည်။ ထို့ကြောင့် ဖြစ်နိုင်လျှင် Composition (Has-A relationship) ကို ဦးစားပေး အသုံးပြုသင့်သည်။
ပြဿနာ: Dog class က Animal ကို extend လုပ်ထားသည်။ RobotDog ပေါ်လာသောအခါ Animal ကို extend လုပ်လျှင် eat() ပါလာမည် (Robot က အစာမစားပါ)။ Machine ကို extend လုပ်လျှင် bark() မပါလာပါ။ Inheritance ဖြင့် ဖြေရှင်းရန် ခက်ခဲပါသည်။
ဖြေရှင်းနည်း (Composition): barkingBehavior နှင့် eatingBehavior ကို Component များအဖြစ် ခွဲထုတ်ပြီး လိုအပ်သလို တွဲစပ်အသုံးပြုခြင်းက ပိုမို ကောင်းမွန်ပါသည်။
Java:
class Dog {
    private BarkingBehavior barker = new BarkingBehavior();
    private EatingBehavior eater = new EatingBehavior();

    public void bark() { barker.bark(); }
    public void eat() { eater.eat(); }
}

class RobotDog {
    private BarkingBehavior barker = new BarkingBehavior();
    // No EatingBehavior

    public void bark() { barker.bark(); }
}
TypeScript:
class Dog {
    private barker = new BarkingBehavior();
    private eater = new EatingBehavior();

    bark() { this.barker.bark(); }
    eat() { this.eater.eat(); }
}

class RobotDog {
    private barker = new BarkingBehavior();
    // No EatingBehavior

    bark() { this.barker.bark(); }
}
RPG Game တစ်ခု ဖန်တီးနေသည်ဟု ဆိုကြပါစို့။ Warrior (ဓားကိုင်သူ)၊ Wizard (မှော်ဆရာ) နှင့် Archer (မြှားပစ်သူ) ဟူ၍ Character များ ရှိသည်။
Inheritance ဖြင့် ချဉ်းကပ်ခြင်း (The Bad Way)
Inheritance ကို အသုံးပြုလျှင် Character ဟုခေါ်သော Base Class တစ်ခု တည်ဆောက်ပြီး ကျန်တာများကို Extend လုပ်ပါမည်။
Character->Warrior(Attack with Sword)Character->Wizard(Attack with Magic)
ပြဿနာ: အကယ်၍ ကျွန်ုပ်တို့က Paladin (ဓားလည်းခုတ်သည်၊ မှော်လည်းသုံးသည်) ဆိုသော Character အသစ် ထပ်ထည့်ချင်လျှင် ဘာလုပ်မည်နည်း။
Warriorကို extend လုပ်လျှင် မှော်သုံးသည့် code မပါလာပါ။Wizardကို extend လုပ်လျှင် ဓားခုတ်သည့် code မပါလာပါ။- Code များကို Copy-Paste လုပ်ရမည့် အခြေအနေ သို့မဟုတ် Inheritance Hierarchy ရှုပ်ထွေးသွားမည့် အခြေအနေ ဖြစ်လာသည်။
Composition ဖြင့် ချဉ်းကပ်ခြင်း (The Good Way)
Inheritance (Is-A) အစား Composition (Has-A) ကို သုံးပါမည်။ Character သည် Warrior ဖြစ်သည် (Is-A) ဟု မသတ်မှတ်ဘဲ၊ Character တွင် လက်နက် ရှိသည် (Has-A) ဟု သတ်မှတ်ပါမည်။ တိုက်ခိုက်ခြင်း အပြုအမူ (Attack Behavior) ကို သီးခြား Class များအဖြစ် ခွဲထုတ်လိုက်ပါမည်။
Java:
// 1. Define the behavior interface
interface AttackStrategy {
    void attack();
}

// 2. Implement specific behaviors
class SwordAttack implements AttackStrategy {
    public void attack() { System.out.println("Swinging a sword!"); }
}

class MagicAttack implements AttackStrategy {
    public void attack() { System.out.println("Casting a fireball!"); }
}

class BowAttack implements AttackStrategy {
    public void attack() { System.out.println("Shooting an arrow!"); }
}

// 3. The main Character class uses Composition
class GameCharacter {
    private AttackStrategy attackStrategy;

    // Inject behavior via constructor
    public GameCharacter(AttackStrategy attackStrategy) {
        this.attackStrategy = attackStrategy;
    }

    // Key Benefit: We can change behavior at runtime!
    public void setWeapon(AttackStrategy newStrategy) {
        this.attackStrategy = newStrategy;
    }

    public void fight() {
        this.attackStrategy.attack();
    }
}

// Usage
public class Main {
    public static void main(String[] args) {
        // Create a Warrior
        GameCharacter player = new GameCharacter(new SwordAttack());
        player.fight(); // Output: Swinging a sword!

        // Suddenly, the player picks up a magic staff
        System.out.println("Player picks up a staff...");
        player.setWeapon(new MagicAttack());
        player.fight(); // Output: Casting a fireball!

        // This dynamic change is impossible with strict Inheritance
    }
}
TypeScript:
// 1. Define the behavior interface
interface AttackStrategy {
    attack(): void;
}

// 2. Implement specific behaviors
class SwordAttack implements AttackStrategy {
    attack(): void { console.log("Swinging a sword!"); }
}

class MagicAttack implements AttackStrategy {
    attack(): void { console.log("Casting a fireball!"); }
}

class BowAttack implements AttackStrategy {
    attack(): void { console.log("Shooting an arrow!"); }
}

// 3. The main Character class uses Composition
class GameCharacter {
    private attackStrategy: AttackStrategy;

    // Inject behavior via constructor
    constructor(attackStrategy: AttackStrategy) {
        this.attackStrategy = attackStrategy;
    }

    // Key Benefit: We can change behavior at runtime!
    setWeapon(newStrategy: AttackStrategy): void {
        this.attackStrategy = newStrategy;
    }

    fight(): void {
        this.attackStrategy.attack();
    }
}

// Usage
// Create a Warrior
const player = new GameCharacter(new SwordAttack());
player.fight(); // Output: Swinging a sword!

// Suddenly, the player picks up a magic staff
console.log("Player picks up a staff...");
player.setWeapon(new MagicAttack());
player.fight(); //
၅.၆ Design Patterns (Gang of Four)
Design Patterns ဆိုတာ Object-Oriented Software ဒီဇိုင်းဆွဲရာမှာ မကြာခဏ ကြုံတွေ့ရလေ့ရှိတဲ့ ပြဿနာတွေအတွက် စမ်းသပ်ပြီးသား၊ ပြန်လည်အသုံးပြုနိုင်တဲ့ Solution (အဖြေ) တွေ ဖြစ်ပါတယ်။ ၁၉၉၄ ခုနှစ်မှာ "Gang of Four (GoF)" လို့ လူသိများတဲ့ စာရေးဆရာ ၄ ဦးက Design Pattern ၂၃ မျိုးကို စုစည်းထုတ်ဝေခဲ့ပါတယ်။
ဒီစာအုပ်မှာတော့ အခြေခံမိတ်ဆက် အနေနဲ့သာ ဖော်ပြမှာဖြစ်ပြီး၊ အသေးစိတ် လေ့လာချင်တယ်ဆိုရင် ကျွန်တော် ရေးထားသည့် Design Pattern စာအုပ် မှာ မြန်မာလို ဖတ်ရှုနိုင်ပါတယ်။
၅.၆.၁ Creational Patterns (ဖန်တီးမှုပုံစံများ)
Object တွေကို "new" keyword သုံးပြီး တိုက်ရိုက်ဆောက်မယ့်အစား၊ လိုအပ်ချက်နဲ့ ကိုက်ညီမယ့် နည်းလမ်းတွေနဲ့ ဘယ်လို ဖန်တီးမလဲ ဆိုတာကို ကိုင်တွယ်ပါတယ်။
- Singleton: Class တစ်ခုအတွက် Object တစ်ခုတည်းသာ ဖန်တီးနိုင်ကြောင်း သေချာစေပါတယ်။ (ဥပမာ - Database Connection Pool, Configuration Manager)။
- Factory Method: Object ဖန်တီးတဲ့ Logic ကို Client ဆီကနေ ဖုံးကွယ်ထားပြီး၊ Subclass တွေကို ဘယ် Object ဖန်တီးမလဲဆိုတာ ဆုံးဖြတ်ခွင့် ပေးပါတယ်။
- Builder: အစိတ်အပိုင်းတွေ များပြားပြီး ရှုပ်ထွေးတဲ့ Object တွေကို အဆင့်ဆင့် တည်ဆောက်ဖို့ အသုံးပြုပါတယ်။ (ဥပမာ - Pizza တစ်ချပ်မှာ Topping တွေ အမျိုးမျိုး ထည့်သလိုမျိုးပါ)။
၅.၆.၂ Structural Patterns (ဖွဲ့စည်းပုံပုံစံများ)
Class နဲ့ Object တွေကို ပိုမိုကြီးမားတဲ့ Structure တွေအဖြစ် ဘယ်လို ဖွဲ့စည်းမလဲ၊ ဘယ်လို ချိတ်ဆက်မလဲ ဆိုတာကို ကိုင်တွယ်ပါတယ်။
- Adapter: မကိုက်ညီတဲ့ (Incompatible) Interface နှစ်ခုကို အတူတကွ အလုပ်လုပ်နိုင်အောင် ကြားခံ ချိတ်ဆက်ပေးပါတယ်။ (ဥပမာ - USB-C to HDMI Adapter လိုမျိုးပါ)။
- Decorator: Object တစ်ခုရဲ့ မူလ Behavior ကို မပြောင်းလဲဘဲ Runtime မှာ တာဝန်အသစ် (Feature အသစ်) တွေ ထပ်ပေါင်းထည့်ပေးပါတယ်။ (Inheritance အစား သုံးလေ့ရှိပါတယ်)။
- Facade: ရှုပ်ထွေးတဲ့ Subsystem တစ်ခုလုံးကို ဖုံးကွယ်ပြီး ရိုးရှင်းတဲ့ Interface တစ်ခု ပံ့ပိုးပေးပါတယ်။ (ဥပမာ - ကားမောင်းရင် စက်နှိုးခလုတ်နှိပ်လိုက်တာနဲ့ အတွင်းထဲက ရှုပ်ထွေးတဲ့ စက်ယန္တရားတွေ အလုပ်လုပ်သွားသလိုပါပဲ)။
- Proxy: Object တစ်ခုအတွက် ကိုယ်စားလှယ် သို့မဟုတ် ကြားခံတစ်ခုအဖြစ် ဆောင်ရွက်ပေးပါတယ်။ (ဥပမာ - Lazy Loading လုပ်တဲ့အခါ၊ Security Check လုပ်တဲ့အခါ သုံးပါတယ်)။
၅.၆.၃ Behavioral Patterns (အပြုအမူပုံစံများ)
Object တွေကြား ဆက်သွယ်ပုံနဲ့ တာဝန်ခွဲဝေပုံကို ကိုင်တွယ်ပါတယ်။
- Observer: Object တစ်ခုရဲ့ State ပြောင်းလဲသွားတဲ့အခါ၊ သူ့ကို မှီခိုနေတဲ့ Object တွေအားလုံး (Subscribers) ကို အလိုအလျောက် အကြောင်းကြားပြီး Update လုပ်စေပါတယ်။ (Youtube Subscribe လုပ်ထားသလိုပါပဲ)။
- Strategy: Algorithm အမျိုးမျိုးကို Family တစ်ခုအဖြစ် သတ်မှတ်ပြီး၊ တစ်ခုချင်းစီကို Encapsulate လုပ်ကာ၊ လိုအပ်သလို အပြန်အလှန် လဲလှယ် အသုံးပြုနိုင်စေပါတယ်။ (Composition over Inheritance ဥပမာမှာ သုံးခဲ့တဲ့ ပုံစံပါ)။
- Command: Request တစ်ခုကို Object တစ်ခုအဖြစ် Encapsulate လုပ်ပါတယ်။ (ဥပမာ - Undo/Redo function တွေမှာ သုံးပါတယ်)။
၅.၇ Design Modeling with UML
UML (Unified Modeling Language) ဆိုတာ Software System တစ်ခုရဲ့ Design ကို Visualize (ပုံဖော်ကြည့်ခြင်း), Specify (သတ်မှတ်ခြင်း), Construct (တည်ဆောက်ခြင်း), နဲ့ Document (မှတ်တမ်းတင်ခြင်း) လုပ်ဖို့အတွက် Standard Graphical Language တစ်ခု ဖြစ်ပါတယ်။ UML အကြောင်း အသေးစိတ်ကိုလည်း Design Pattern စာအုပ်မှာ ရေးသားထားပြီးသား ဖြစ်လို့ ဒီစာအုပ်မှာ အခြေခံ သဘောတရားကို ပဲ ဖော်ပြထားပါတယ်။
C4 Model မပေါ်ခင်က UML ဟာ Industry Standard ဖြစ်ခဲ့ပြီး၊ ယနေ့ထက်ထိ Class Diagram နဲ့ Sequence Diagram တွေကို တွင်ကျယ်စွာ သုံးနေဆဲ ဖြစ်ပါတယ်။
အဓိက UML Diagram အချို့:
၁။ Class Diagram:
စနစ်ရဲ့ Static Structure ကို ဖော်ပြပါတယ်။ Class တွေ၊ Attribute တွေ၊ Method တွေ၊ နဲ့ သူတို့ကြားက ဆက်ဆံရေး (Inheritance, Composition) တွေကို ပြသပါတယ်။
classDiagram
    class Animal {
        +String name
        +makeSound()
    }
    class Dog {
        +bark()
    }
    class Cat {
        +meow()
    }
    Animal <|-- Dog : Inheritance
    Animal <|-- Cat : Inheritance
၂။ Sequence Diagram:
Object တွေဟာ အချိန်နဲ့အမျှ Message တွေ ပေးပို့ခြင်းဖြင့် ဘယ်လို အပြန်အလှန် ဆက်သွယ်သလဲ (Interaction) ဆိုတာကို ဖော်ပြပါတယ်။ Logic Flow ကို နားလည်ဖို့ အလွန်အသုံးဝင်ပါတယ်။
sequenceDiagram
    participant User
    participant WebServer
    participant Database

    User->>WebServer: 1. GET /users/1
    WebServer->>Database: 2. SELECT * FROM users WHERE id=1
    Database-->>WebServer: 3. Return User Data
    WebServer-->>User: 4. Return HTML Page
၃။ Use Case Diagram:
Actor (သုံးစွဲသူ) တွေနဲ့ Use Case (စနစ်ရဲ့ လုပ်ဆောင်ချက်) တွေကြားက ဆက်ဆံရေးကို ဖော်ပြပါတယ်။ Requirement တွေကို မြင်သာအောင် ပြသရာမှာ သုံးပါတယ်။
graph TD
    User([Customer])
    Server([Bank Server])

    subgraph ATM_System [ATM System]
        UC1((Login))
        UC2((Check Balance))
        UC3((Withdraw Cash))
        UC4((Verify PIN))
        UC5((Print Receipt))
    end

    User --> UC1
    User --> UC2
    User --> UC3

    UC1 -.->|include| UC4
    UC3 -.->|extend| UC5

    UC1 --> Server
    UC3 --> Server

    style UC1 fill:#e1f5ff,stroke:#333,stroke-width:2px
    style UC2 fill:#e1f5ff,stroke:#333,stroke-width:2px
    style UC3 fill:#e1f5ff,stroke:#333,stroke-width:2px
    style UC4 fill:#fff4e1,stroke:#333,stroke-width:2px
    style UC5 fill:#fff4e1,stroke:#333,stroke-width:2px
    style User fill:#90EE90,stroke:#333,stroke-width:2px
    style Server fill:#FFB6C1,stroke:#333,stroke-width:2px
မှန်ကန်ပါတယ်၊ ခင်ဗျာ။ အရင်ဆွေးနွေးခဲ့တဲ့ Diagram တွေနဲ့ ရှင်းလင်းချက်တွေက ဒီစာသားထဲမှာ ကျန်နေခဲ့ပါတယ်။ စာဖတ်သူတွေ DDD ကို ပိုမြင်သာအောင် အရင်ဆွေးနွေးခဲ့တဲ့ Mermaid Diagram တွေနဲ့ Context Map တွေကို ပြန်လည်ပေါင်းစပ်ပြီး အပြည့်အစုံ ပြန်ဖြည့်ရေးသားပေးလိုက်ပါတယ်။
အောက်ပါအတိုင်း အစားထိုး အသုံးပြုနိုင်ပါတယ်။
၅.၈ Domain-Driven Design (DDD) Principles
Domain-Driven Design (DDD) ဆိုတာ Eric Evans မိတ်ဆက်ခဲ့တဲ့ Software Design ချဉ်းကပ်မှုတစ်ခု ဖြစ်ပါတယ်။ ရိုးရှင်းတဲ့ Application တွေ (CRUD Apps) အတွက် မဟုတ်ဘဲ၊ ရှုပ်ထွေးတဲ့ Business Logic တွေပါဝင်တဲ့ Enterprise System ကြီးတွေ တည်ဆောက်ရာမှာ အသုံးပြုပါတယ်။
Mid-level Developer အများစုဟာ Technical (Database, Framework) ကိုပဲ အာရုံစိုက်လေ့ရှိကြပါတယ်။ DDD ကတော့ "Software ဟာ Business ပြဿနာကို ဖြေရှင်းဖို့ ဖြစ်တယ်" ဆိုတဲ့ အချက်ကို အခြေခံပြီး၊ Business Domain ကို နားလည်အောင် အရင်လုပ်ခိုင်းပါတယ်။
DDD ကို အပိုင်းကြီး ၂ ပိုင်း ခွဲခြားနိုင်ပါတယ်။
၅.၈.၁ Strategic Design (မဟာဗျူဟာမြောက် ဒီဇိုင်း)
ဒါက System အကြီးကြီးတစ်ခုလုံးကို ဘယ်လို ဖွဲ့စည်းမလဲ၊ Team တွေ ဘယ်လို စကားပြောမလဲဆိုတဲ့ High-level အပိုင်းဖြစ်ပါတယ်။
၁။ Ubiquitous Language (နေရာတိုင်းသုံး ဘုံဘာသာစကား)
Developer တွေနဲ့ Business Experts (Domain Experts) တွေကြားမှာ နားလည်မှု လွဲမှားခြင်းက Software Project တွေ ကျဆုံးရတဲ့ အဓိက အကြောင်းရင်းပါ။
- ပြဿနာ: Business သမားက "Client" လို့ ပြောတယ်၊ Developer က Database မှာ "User" လို့ သိမ်းတယ်၊ UI မှာ "Customer" လို့ ပြတယ်။ ဒီလို စကားလုံး မညီတာက Communication Error တွေကို ဖြစ်စေပါတယ်။
- ဖြေရှင်းနည်း: Meeting မှာ ပြောတဲ့ စကားလုံး၊ Document မှာ ရေးတဲ့ စကားလုံး၊ Code ထဲက Class Name, Variable Name အားလုံးဟာ တစ်ထပ်တည်း ဖြစ်နေရပါမယ်။ ဘာသာပြန်စရာ မလိုရပါဘူး။
၂။ Bounded Context (နယ်နိမိတ်သတ်မှတ်ခြင်း)
စကားလုံးတစ်လုံးဟာ နေရာတိုင်းမှာ အဓိပ္ပါယ် မတူနိုင်ပါဘူး။ Context (အခြေအနေ) ပေါ်မူတည်ပြီး အဓိပ္ပာယ် ကွဲပြားနိုင်ပါတယ်။ Bounded Context ဆိုတာ ဒီစကားလုံးတွေရဲ့ အဓိပ္ပာယ် သတ်မှတ်ချက် မတူညီတော့တဲ့ နယ်နိမိတ်မျဉ်း ဖြစ်ပါတယ်။
အောက်ပါ Diagram မှာ E-commerce System တစ်ခုရဲ့ Context နှစ်ခု ကွဲပြားပုံကို ကြည့်ပါ။
- Sales Context မှာ
Productဆိုတာ "ဈေးနှုန်း၊ အရောင်၊ ပုံစံ" တွေ အဓိက ဖြစ်ပါတယ်။ - Shipping Context မှာ
Productဆိုတာ "အလေးချိန်၊ အတိုင်းအတာ၊ ပို့ဆောင်ခ" သာ အဓိက ဖြစ်ပါတယ်။
graph LR
    subgraph Sales_Context [Sales Bounded Context]
        direction TB
        SP[<b>Product</b><br/>id, name, price<br/>description]
        Order[<b>Order</b><br/>orderId, totalAmount]
        SP --> Order
    end

    subgraph Shipping_Context [Shipping Bounded Context]
        direction TB
        ShP[<b>Product</b><br/>sku, weight<br/>dimensions]
        Shipment[<b>Shipment</b><br/>trackingCode, status]
        ShP --> Shipment
    end

    Sales_Context -- "Translates via ACL" --> Shipping_Context

    style Sales_Context fill:#e1f5fe,stroke:#01579b
    style Shipping_Context fill:#fff3e0,stroke:#e65100
(ACL = Anti-Corruption Layer: Context တစ်ခုနဲ့ တစ်ခု Data လွှဲပြောင်းရာမှာ ကြားခံ ဘာသာပြန်ပေးတဲ့ အလွှာ)
၅.၈.၂ Tactical Design (နည်းဗျူဟာမြောက် ဒီဇိုင်း)
ဒါက Bounded Context တစ်ခုရဲ့ အတွင်းပိုင်းမှာ Model တွေကို Code အနေနဲ့ ဘယ်လို တည်ဆောက်မလဲဆိုတဲ့ အသေးစိတ် အပိုင်းဖြစ်ပါတယ်။
၁။ Entity (ထာဝရတည်ရှိသော ဝတ္ထု)
ID (Identity) ရှိတဲ့ Object တွေဖြစ်ပါတယ်။ သူ့ရဲ့ အတွင်းက Data တွေ ပြောင်းလဲသွားရင်တောင် ID မပြောင်းသရွေ့ သူဟာ အဲဒီ Object ပါပဲ။ (ဥပမာ - User, Order, Product)။
၂။ Value Object (တန်ဖိုးအခြေပြု ဝတ္ထု)
ID မရှိဘဲ တန်ဖိုး (Value) ပေါ်မှာသာ မူတည်တဲ့ Object တွေဖြစ်ပါတယ်။ ဖန်တီးပြီးရင် ပြင်လို့ မရပါဘူး (Immutable)။ (ဥပမာ - Money, Address, Color)။
| Feature | Entity | Value Object |
|---|---|---|
| Identity | ရှိတယ် (ID) | မရှိဘူး (Value only) |
| Equality | ID တူရင် တူတယ် | တန်ဖိုးအားလုံး တူမှ တူတယ် |
| Mutability | ပြောင်းလဲလို့ရတယ် (Mutable) | ပြောင်းလို့မရဘူး (Immutable) |
၃။ Aggregate & Aggregate Root
ဆက်စပ်နေတဲ့ Entity နဲ့ Value Object တွေကို စုစည်းထားတဲ့ Cluster (အစုအဖွဲ့) ဖြစ်ပါတယ်။ ဒါက Data Consistency အတွက် အရေးကြီးပါတယ်။
- Aggregate Root: အစုအဖွဲ့တစ်ခုလုံးကို ကိုယ်စားပြုတဲ့ အဓိက Entity ပါ။ ပြင်ပကနေ ဒီ Root ကနေတစ်ဆင့်ပဲ ဝင်ရောက်ခွင့် ပြုပါတယ်။
အောက်ပါ Diagram မှာ Aggregate Boundary ကို ရှင်းပြထားပါတယ်။
- ပြင်ပက Object တွေ (ဥပမာ
Client) ကOrder(Root) ကိုပဲ လှမ်းချိတ်လို့ရပါတယ်။ - အတွင်းပိုင်းက
OrderItemကို တိုက်ရိုက် လှမ်းချိတ်ခွင့် မရှိပါဘူး။
graph TD
    subgraph Aggregate_Boundary [Order Aggregate]
        Order[Order Root<br/>addLineItem<br/>removeLineItem]
        Item1[OrderItem 1]
        Item2[OrderItem 2]

        Order --> Item1
        Order --> Item2
    end

    Client[Client / External Object]

    Client -->|Allowed: Calls Root| Order
    Client -.->|Forbidden: Direct Access| Item1

    style Aggregate_Boundary fill:#f9fbe7,stroke:#827717,stroke-dasharray: 5 5
    style Order fill:#c5e1a5,stroke:#33691e,stroke-width:2px
၄။ Domain Service
Entity သို့မဟုတ် Value Object တစ်ခုတည်းနဲ့ မဆိုင်တဲ့ Business Logic တွေကို ရေးသားဖို့ နေရာဖြစ်ပါတယ်။ (ဥပမာ - ငွေလွှဲခြင်း Logic)။ Account တစ်ခုချင်းစီက "ငွေလွှဲတယ်" ဆိုတာကို မသိသင့်ပါဘူး။ သူတို့က "ငွေသွင်း/ငွေထုတ်" (Debit/Credit) ကိုပဲ သိသင့်ပါတယ်။ TransferService က ဒါကို စီမံပေးပါတယ်။
sequenceDiagram
    participant Client
    participant Service as TransferDomainService
    participant AccA as Account A
    participant AccB as Account B

    Client->>Service: transfer(from: A, to: B, amount: 100)

    Note over Service: 1. Check if A has balance
    Service->>AccA: withdraw(100)

    alt Withdraw Success
        Note over Service: 2. Deposit to B
        Service->>AccB: deposit(100)
        Service-->>Client: Transfer Successful
    else Insufficient Funds
        Service-->>Client: Transfer Failed
    end
၅။ Repository
Aggregate တွေကို Database ကနေ ဆွဲထုတ်ခြင်း၊ သိမ်းဆည်းခြင်း ပြုလုပ်ဖို့ Collection လိုမျိုး Interface ဖြစ်ပါတယ်။ SQL Query တွေကို Business Logic (Domain Layer) ထဲမှာ မရေးဘဲ Repository Implementation (Infrastructure Layer) မှာ ဝှက်ထားရပါမယ်။
၅.၈.၃ Anemic vs. Rich Domain Model
Developer တော်တော်များများ မှားလေ့ရှိတဲ့ အချက်က Class တွေဆောက်ပြီးရင် Data (Getter/Setter) ပဲ ထည့်ပြီး၊ Logic တွေကို Service Layer မှာ သွားရေးတတ်တာပါ။ ဒါကို Anemic Domain Model (သွေးအားနည်းသော မော်ဒယ်) လို့ခေါ်ပြီး DDD မှာ ရှောင်ကြဉ်သင့်ပါတယ်။
DDD က အားပေးတာက Rich Domain Model ပါ။ Data ရှိတဲ့နေရာမှာ Logic ပါ ရှိရပါမယ်။
Anemic Model (Bad Example):
// Class ထဲမှာ Data ပဲ ရှိတယ်
class Order {
    public List<OrderItem> items;
    public double totalAmount;
    // Getters and Setters...
}

// Logic က Service ထဲ ရောက်နေတယ် (Procedural Code)
class OrderService {
    public void addItem(Order order, Item item) {
        order.getItems().add(item);
        order.setTotalAmount(order.getTotalAmount() + item.getPrice()); // Logic is here!
    }
}
Rich Domain Model (DDD Way):
// Data ရော Logic ရော တစ်နေရာတည်းမှာ ရှိတယ် (OOP)
class Order {
    private List<OrderItem> items;
    private double totalAmount;

    public void addItem(Item item) {
        // Validation Logic
        if (item == null) throw new Error("Item cannot be null");

        // State Change Logic
        this.items.add(item);
        recalculateTotal();
    }

    private void recalculateTotal() {
        this.totalAmount = items.stream().mapToDouble(i -> i.getPrice()).sum();
    }
}
၅.၈.၄ The Big Picture: DDD Layered Architecture
DDD ကို လက်တွေ့ အကောင်အထည်ဖော်တဲ့အခါ Layer ၄ ခု ခွဲပြီး တည်ဆောက်လေ့ရှိပါတယ်။
- Interface Layer: User နဲ့ ဆက်သွယ်တဲ့အပိုင်း (Controller/API)။
- Application Layer: လုပ်ငန်းစဉ်တွေကို စီမံတဲ့အပိုင်း (Flow control)။ Logic မပါရပါ။
- Domain Layer: Business Logic အားလုံး ဒီမှာ ရှိရပါမယ် (Heart of Software)။
- Infrastructure Layer: Database, Email, External API စတာတွေနဲ့ ချိတ်ဆက်တဲ့အပိုင်း။
graph TD
    subgraph Interface_Layer [Interface Layer - Web/API]
        Controller[OrderController]
    end
    subgraph Application_Layer [Application Layer - Use Cases]
        AppService[OrderApplicationService]
    end
    subgraph Domain_Layer [Domain Layer - Business Logic]
        direction TB
        DomainService[PricingService]

        subgraph Aggregate [Order Aggregate]
            Root[Order Root]
            Child[OrderItem]
            Root --> Child
        end

        IRepo[[OrderRepository Interface]]

        AppService --> DomainService
        AppService --> Root
        DomainService --> Root
        Root --> IRepo
    end
    subgraph Infrastructure_Layer [Infrastructure Layer - Technical]
        RepoImpl[OrderRepository Implementation]
        DB[(Database)]

        RepoImpl -.->|Implements| IRepo
        RepoImpl --> DB
    end
    Controller --> AppService

    style Domain_Layer fill:#e8f5e9,stroke:#2e7d32,stroke-width:2px
    style Aggregate fill:#ffffff,stroke:#2e7d32,stroke-dasharray: 5 5
ဒီ Diagram မှာ အရေးကြီးဆုံးအချက်က Dependency Inversion ပါ။ Domain Layer က Database (Infrastructure) ကို မမှီခိုပါဘူး။ Infrastructure ကသာ Domain Layer (Interface) ကို ပြန်ပြီး မှီခို (Implement) ထားတာကို တွေ့ရမှာ ဖြစ်ပါတယ်။ ဒါက DDD ရဲ့ အဓိက လျှို့ဝှက်ချက် ဖြစ်ပါတယ်။
ဒီအခန်း ဟာ Software Engineer တစ်ယောက်အတွက် အရေးပါသည့် အခန်းဖြစ်သလို နားလည်ရန် အချိန်လည်း ပေးရမှာပါ။ Design ကောင်းတစ်ခုဟာ Software Engineering ရဲ့ အခြေခံ အုတ်မြစ်ဖြစ်ပါတယ်။ အုတ်မြစ်ခိုင်မှသာ ရေရှည်တည်တံ့ နိုင်မှာပါ။ အရင်က ကျွန်တော် ရေးထားသည့် Developer Intern နှင့် Design Pattern စာအုပ်ကို မဖတ်ရသေးလျှင် ပြန်ဖတ်ကြည့်ဖို့ တိုက်တွန်းလိုပါတယ်။ ဒါမှသာ ဒီအခန်းကို ပိုပြီး နားလည်နိုင်မှာပါ။